
Nostalgic School Day Cookies: A Sweet Journey Back to Childhood
Ah, the sweet aroma of freshly baked cookies wafting through the hallways of my childhood elementary school! It’s a smell that brings back cherished memories—carting home a small paper bag filled with warm School Day Cookies. Each bite was a delightful blend of flavors, packed with oats, a hint of citrus, and the warm crunch of walnuts. Those cookies weren’t just snacks; they were edible hugs from my mom, a comforting reminder of home and care after a long day of studies.
As I grew older, I searched for that same feeling and flavor, but many store-bought options left me disappointed and nostalgic. After countless attempts to recreate those iconic cookies—each failure an opportunity to tweak and improve—I finally perfected a recipe that’s not only reminiscent of those beloved School Day Cookies but also elevates them with fresh ingredients like orange juice and zest. Trust me, there’s nothing quite like enjoying these goodies fresh from the oven, with a glass of milk or a cozy cup of tea on the side.
In this blog post, I’ll share my tried-and-true recipe for School Day Cookies, along with tips, tricks, and all the love I poured into perfecting each batch. You’ll learn not just how to bake these cookies but how to create memories with each bite.
What Are School Day Cookies?
School Day Cookies are a nostalgic treat that many of us remember from the days of lunchboxes and midday snacks. Originating from the homes of busy parents who wanted to pack their kids a wholesome and delicious pick-me-up, these cookies have become a staple of comfort food.
Imagine biting into a warm cookie that strikes a perfect balance between chewy and crispy—with strands of gooey oats throughout, a pleasant crunch from chopped walnuts, and a bright pop of citrus. With their delightful combination of flavors and textures, these cookies are unique not only for their taste but for the way they transport you back to your school days. They’re perfect for after school, family gatherings, or even as a sweet surprise for your coworkers.
Make them on a rainy afternoon when you want to bridge a gap between childhood and adulthood—or even bake a batch to share with your loved ones while reminiscing about your fondest school memories. These cookies are an experience, a treat, and a way to connect anew.
Why You’ll Love This Recipe
Comforting Nostalgia: The familiar flavors of School Day Cookies bring back memories, evoking the joy of your childhood. Each bite will remind you of simpler times when life revolved around recess and kickball games.
Homemade Goodness: Unlike store-bought cookies, this recipe uses real ingredients that create a homemade taste you simply can’t find in packaged treats. You’ll feel the difference and enjoy the satisfaction of baking from scratch.
Cost-Effective: Making cookies at home is not only fun, but it’s also wallet-friendly. A batch of these cookies costs significantly less than their store-bought counterparts, allowing you to indulge without the guilt.
Customization Options: Want to play with the flavors? You can easily swap ingredients to match your preferences or dietary needs. Think chocolate chips instead of walnuts or golden raisins for an extra sweetness!
Easy to Make: This recipe is accessible for bakers of all skill levels. With only a handful of steps and about 30 minutes of your time, you can create delightful cookies that will impress friends and family alike.
Now that you’re hooked on the idea, let’s dive into the delicious details of crafting your own School Day Cookies!

Ingredients
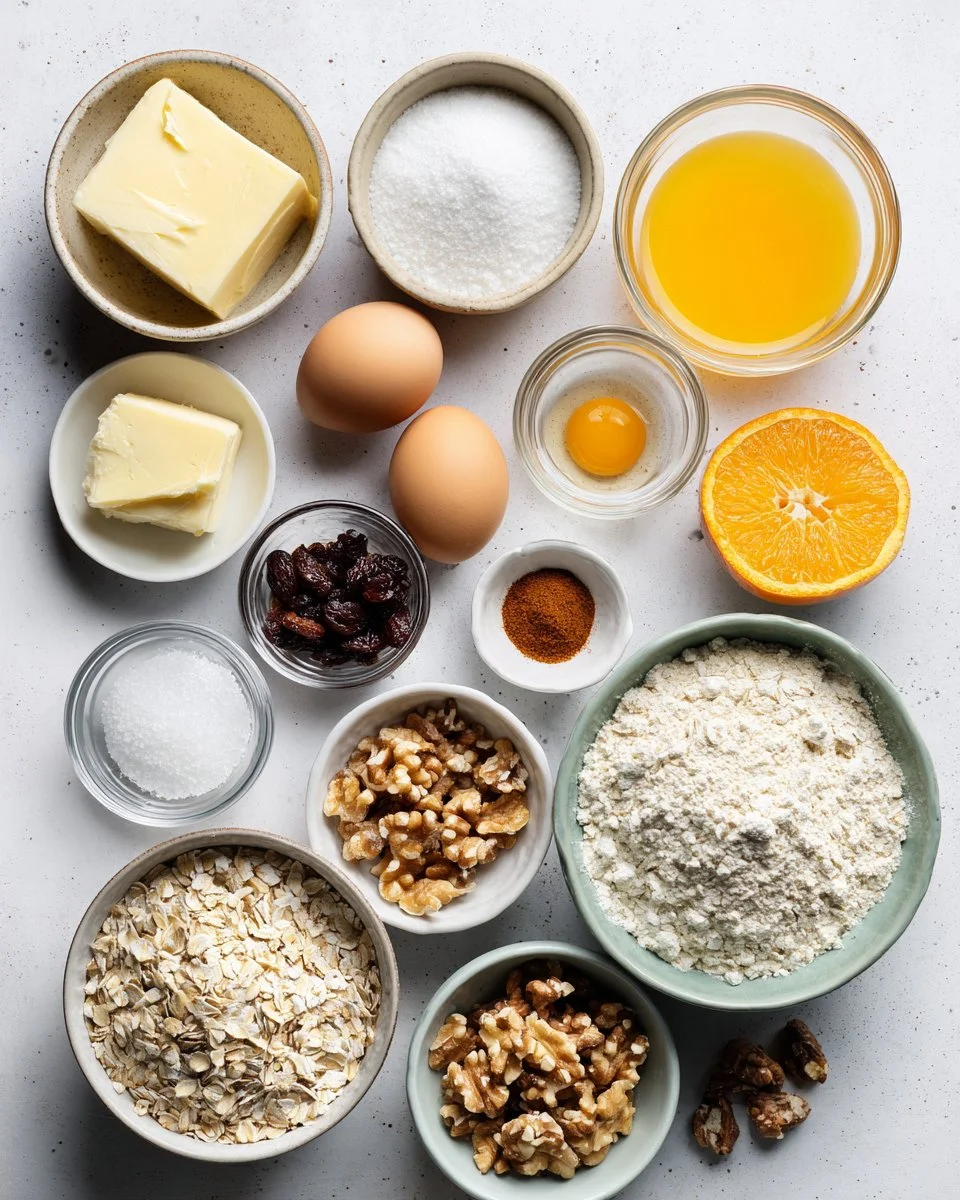
Here’s what you’ll need to whip up a batch of delectable School Day Cookies:
- 1 cup unsalted butter, room temperature: High-quality, fresh butter is key for a rich flavor.
- 1 cup granulated sugar: Sweetens the deal!
- 2 large eggs, room temperature: Room temperature eggs emulsify better for a smooth batter.
- 1/4 cup orange juice, freshly squeezed: Brightens the cookies and adds moisture.
- 2 tablespoons orange zest: Adds a vibrant flavor that elevates the cookie.
- 2 teaspoons vanilla extract: Always opt for pure vanilla for the best flavor.
- 2 cups all-purpose flour: A must-have base for your cookie dough.
- 2 cups old-fashioned oatmeal: Get that chewy texture and hearty bite.
- 1/2 teaspoon kosher salt: Balances the sweetness.
- 1/2 cup raisins (or swap for chocolate chips if preferred): For bursts of sweetness.
- 1/2 cup chopped walnuts: Adds a satisfying crunch.
Chef’s Tip: Make sure your butter is at room temperature to achieve a creamy texture when creaming with sugar.
Step-by-Step Instructions
Ready to bake? Let’s get those cookies in the oven!
Preheat the Oven: Set your oven to 375°F (190°C). The perfect baking temperature for golden brown edges.
Prep the Baking Sheets: Line three large baking sheets with parchment paper to prevent sticking and ensure even baking.
Cream Butter and Sugar: In the bowl of a stand mixer fitted with the paddle attachment, add in the 1 cup of room temperature butter and 1 cup of granulated sugar. Cream together on medium speed until smooth and fluffy—this should take about 2-3 minutes.
Incorporate Eggs: Add the two large eggs, one at a time, mixing well after each addition. Don’t forget to scrape down the sides of the bowl to make sure everything’s blended perfectly!
Add Flavorings: Turn off the mixer and add the 1/4 cup of freshly squeezed orange juice, 2 tablespoons of orange zest, and 2 teaspoons of vanilla extract. Stir the mixture until combined.
Combine Dry Ingredients: Gradually add 2 cups of all-purpose flour, 2 cups of old-fashioned oatmeal, and 1/2 teaspoon of kosher salt. Mix on low speed until just combined.
Fold in Add-ins: Gently fold in 1/2 cup of raisins and 1/2 cup of chopped walnuts until evenly distributed throughout the dough.
Shape the Cookies: Using a 2-tablespoon cookie scoop, drop the dough onto the prepared baking sheets, spacing each cookie about 2 inches apart. Flatten each cookie slightly to help them hold their shape while baking.
Bake: Place the trays in the preheated oven and bake for 12-14 minutes. You’ll know they’re done when they’ve turned lightly golden brown around the edges.
Cooling Time: Let the cookies cool on the baking sheets for a few minutes before transferring them to a wire rack to cool completely.
Common Mistake to Avoid: Don’t over-bake! To ensure the chewy texture, take them out of the oven just when the edges are golden.

Expert Tips & Tricks
Storage: Once cooled, store your cookies in an airtight container at room temperature for up to 5 days. For longer storage, freeze them in a freezer-safe container for up to 3 months.
Make-Ahead Instructions: You can prepare the dough ahead of time and refrigerate it for up to 24 hours before baking. Just allow it to soften slightly at room temperature before scooping.
Troubleshooting: If your cookies come out too dry, make sure you’re measuring the flour accurately. Spoon it into the measuring cup rather than scooping directly from the bag for more precise measurements.
Serving Suggestions
These School Day Cookies are great on their own, but why not take it a step further? Serve them alongside a tall glass of cold milk or a steaming cup of coffee for a delightful pairing. For a cozy evening, how about presenting them on a rustic wooden board with a few slices of fresh oranges? They’re perfect for school bake sales, holiday gatherings, or simply as a warm treat after a chilly day outdoors.
Variations & Substitutions
Feel free to get creative! Here are some alternatives and variations to try out:
Flavors: Swap out the walnuts for pecans or even macadamia nuts for a different texture. Mix in some chocolate chips for a sweeter variation!
Dietary Needs: For a gluten-free version, substitute the all-purpose flour with a gluten-free blend. You can also replace sugar with coconut sugar for a lower glycemic index.
Seasonal Twists: During the fall, consider adding in cinnamon or pumpkin spice. In the summer, fresh berries can provide a unique and seasonal twist.
Nutrition & Storage Info
- Prep Time: 15 minutes
- Cook Time: 12-14 minutes
- Total Time: Approx. 30 minutes
- Yield: About 30 cookies
- Estimated Calories: Approximately 150 calories per cookie
- Storage: Room temperature for up to 5 days, fridge for up to a week, freezer for 3 months.
FAQ Section
Can I substitute margarine for butter?
- While you can swap margarine, butter provides a richer flavor that’s hard to replicate with margarine.
Can I use quick oats instead of old-fashioned oats?
- Old-fashioned oats provide a chewier texture, but quick oats can work in a pinch if you prefer.
How do I know when my cookies are done?
- Look for a light golden color around the edges. They will continue to cook slightly as they cool.
Can I make these ahead of time?
- Absolutely! You can prepare the dough ahead and refrigerate it for 24 hours, or freeze it for up to a month.
What’s the best way to store leftover cookies?
- Keep them in an airtight container to prevent drying out. You can also layer them with parchment paper to keep them fresh.
Can I add chocolate chips?
- Definitely! You can replace or mix in chocolate chips for a decadent twist.
Can these be made vegan?
- You can use flax eggs and a non-dairy butter alternative for a vegan option.
Why are my cookies flat?
- This can happen if your butter is too soft or melted. Ensure it’s at room temperature for a fluffy texture.
Is it necessary to chill the dough?
- Chilling isn’t required but helps the cookies maintain their shape. If it’s a warm day, consider chilling the dough for about 30 minutes before baking.
How can I make this recipe healthier?
- Substitute half of the flour with whole wheat flour, use less sugar, or try natural sweeteners like honey or maple syrup.
Conclusion
These School Day Cookies are not just a recipe; they’re a doorway to delectable memories and newfound connections. I encourage you to give them a try and share the warmth that comes with each bite. Don’t forget to comment below with your thoughts or any tweaks you made; I’d love to hear how your baking adventure turned out! And while you’re here, check out my blog for more delightful recipes that bring nostalgia home! Happy baking!
School Day Cookies
Ingredients
For the cookie dough
- 1 cup unsalted butter, room temperature High-quality, fresh butter is key for a rich flavor.
- 1 cup granulated sugar Sweetens the deal!
- 2 large eggs, room temperature Room temperature eggs emulsify better for a smooth batter.
- 1/4 cup orange juice, freshly squeezed Brightens the cookies and adds moisture.
- 2 tablespoons orange zest Adds a vibrant flavor that elevates the cookie.
- 2 teaspoons vanilla extract Always opt for pure vanilla for the best flavor.
- 2 cups all-purpose flour A must-have base for your cookie dough.
- 2 cups old-fashioned oatmeal Get that chewy texture and hearty bite.
- 1/2 teaspoon kosher salt Balances the sweetness.
- 1/2 cup raisins (or swap for chocolate chips if preferred) For bursts of sweetness.
- 1/2 cup chopped walnuts Adds a satisfying crunch.
Instructions
Preparation
- Preheat your oven to 375°F (190°C).
- Line three large baking sheets with parchment paper.
- In the bowl of a stand mixer, cream together 1 cup of room temperature butter and 1 cup of granulated sugar on medium speed until smooth and fluffy (about 2-3 minutes).
- Add the two large eggs one at a time, mixing well after each addition.
- Add 1/4 cup orange juice, 2 tablespoons orange zest, and 2 teaspoons vanilla extract and stir until combined.
- Gradually add 2 cups all-purpose flour, 2 cups old-fashioned oatmeal, and 1/2 teaspoon kosher salt. Mix on low speed until just combined.
- Gently fold in 1/2 cup raisins and 1/2 cup chopped walnuts.
- Using a 2-tablespoon cookie scoop, drop the dough onto the prepared baking sheets, spacing each cookie about 2 inches apart. Flatten each cookie slightly.
Baking
- Bake in the preheated oven for 12-14 minutes, or until the cookies are lightly golden brown around the edges.
- Let the cookies cool on the baking sheets for a few minutes before transferring them to a wire rack to cool completely.