

Irresistible Oreo Milkshake Recipe: A Creamy Delight Worth Sipping
Ah, the Oreo milkshake—a blissful concoction that has the power to transport you back to childhood with just one sip. I still remember those hot summer afternoons when my family would gather at our favorite diner, eagerly waiting for our frosty treats to arrive. When the tall glass filled with a velvety Oreo milkshake came into view, my heart would race with excitement. There’s something so magical about that creamy blend of vanilla ice cream, rich chocolatey Oreos, and just the right touch of milk that makes it the perfect comfort food.
This Oreo milkshake isn’t just any version you might find at a fast-food joint; it’s a special recipe that I’ve perfected over time. The key ingredients are simple, but with a few tips and tricks, I promise you’ll achieve a smoother, richer flavor than anything you could buy. Plus, you can customize it just the way you love!
In today’s post, I’m excited to share this easy recipe that is sure to become a staple in your household, just like it is in mine. So grab a blender, and let’s get ready to whip up a treat that will make your taste buds dance and create memories that your family will cherish for years to come!
What Are Oreo Milkshakes?
Oreo milkshakes have become a beloved dessert across the globe, originating in the United States where soda fountains and diners first popularized milkshakes. These delightful beverages combine smooth vanilla ice cream with crushed Oreo cookies, yielding a lavish treat that’s creamy and indulgent. The combination of sweet and crunchy Oreo pieces mixed through a thick milkshake creates a delightful textural contrast—each sip is rich and flavorful, pulling you back into those carefree childhood days of delight.
You’re not just consuming a beverage; you’re indulging in a nostalgic experience, evoking memories of family outings and summertime fun. Whether enjoyed on a hot day or as a sweet finish to a meal, Oreo milkshakes are perfect for any occasion when you’re craving ice-cream comfort.
So when should you whip these up? Whether it’s to celebrate a special event, an afternoon pick-me-up, or simply because life calls for a sweet treat, Oreo milkshakes are always a win.
Why You’ll Love This Recipe
There are countless reasons why this Oreo milkshake recipe will win your heart:
Superior Taste: Unlike the chain store options, this recipe uses high-quality vanilla ice cream and fresh Oreos, giving you a richer, creamier experience. I’ve also experimented with different brands of ice cream, and I can confidently say that using a quality, heavy cream ice cream makes all the difference!
Cost-Effective: With just a few simple ingredients, you’ll save money compared to ordering a milkshake from your local diner. Plus, you can make multiple servings at home for the price of one store-bought shake.
Customizable: Not a fan of vanilla ice cream? Swap it out for chocolate or even mint! Add extra toppings like peanut butter or fresh fruit for an added twist. The choice is yours!
Simplicity: This recipe is easy to follow, requiring minimal kitchen skills. In just about 10 minutes, you can treat yourself and your family to something special. No need to be a pro chef here!
Nostalgia Guaranteed: Making these Oreo milkshakes can be an excellent bonding activity. You can create an assembly line with the kids, allowing them to crush the Oreos or add their favorite toppings.
So, grab your blender and let’s get started!
{image_template}
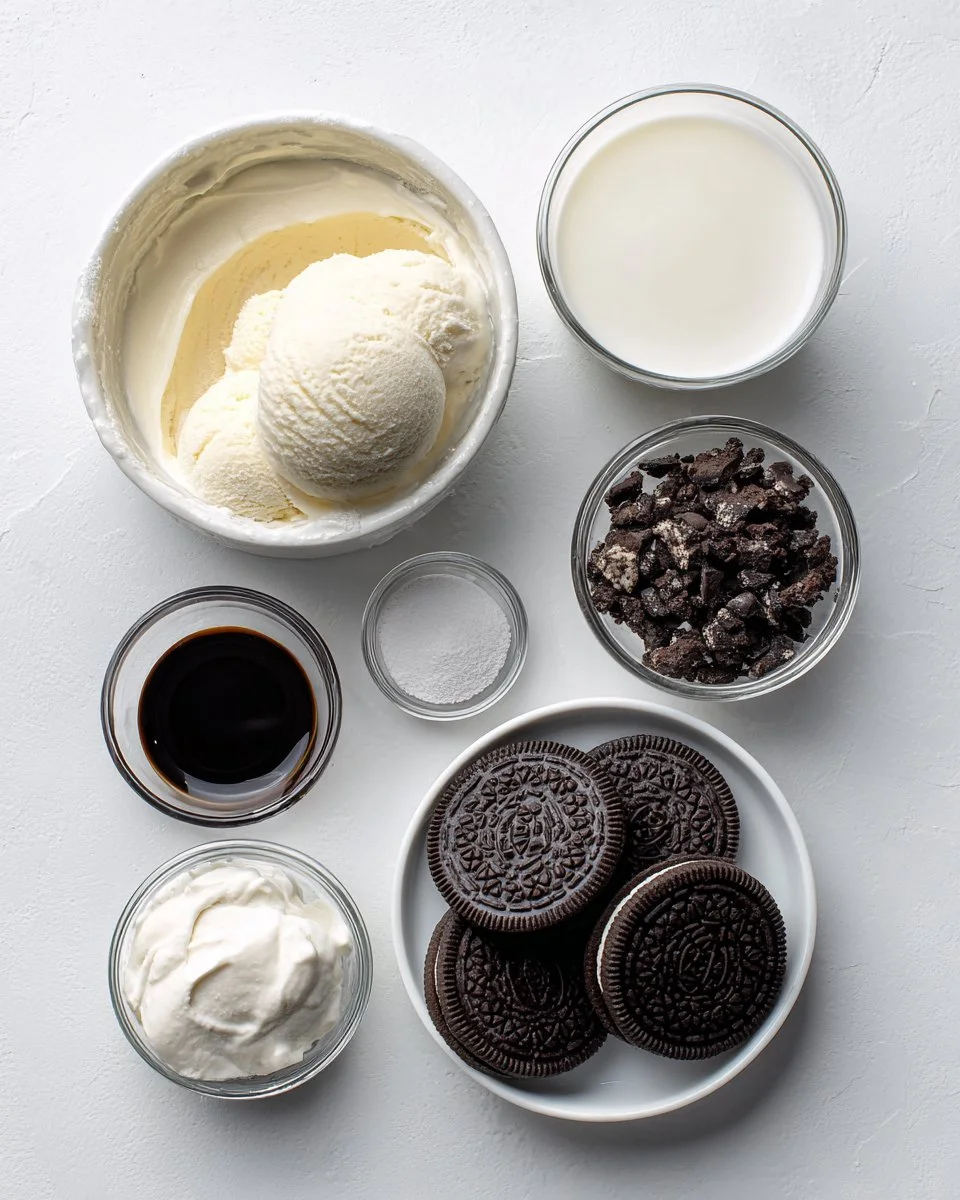
Ingredients
2 cups vanilla ice cream, softened slightly
To achieve a smooth blend, let your ice cream soften at room temperature for 10-15 minutes before using. Using a high-fat content ice cream will create a richer shake—brand recommendations include Häagen-Dazs or Ben & Jerry’s.1/2 cup whole milk
Whole milk offers the best creaminess. For a lighter version, you can substitute with 2% milk, but I wouldn’t recommend skim for this luxurious shake.6-8 Oreo cookies, roughly chopped
Feel free to crush your Oreos into different sizes—some dust for flavor and some chunkier pieces add delightful bites in your shake.1/2 teaspoon vanilla extract
A high-quality vanilla extract enhances the flavor. Avoid imitation vanilla if you can.Whipped cream (optional), for topping
Store-bought or homemade, whipped cream transforms this milkshake into an even more luxurious dessert!Oreo cookies (optional), for topping
Crush or sprinkle whole Oreos on top for added texture.Chocolate syrup (optional), for topping
For a chocolate lover’s dream, drizzle chocolate syrup on the glass for a beautiful presentation.
Step-by-Step Instructions
Prep the Ice Cream:
Start by letting your vanilla ice cream sit at room temperature until it’s slightly softened, about 10-15 minutes. This will help blend everything smoothly.Blend the Base:
Place the softened ice cream, milk, and vanilla extract into your blender. Blend on high speed until the mixture is smooth and creamy, approximately 30-60 seconds. You’ll know it’s ready when you see a silky texture.Oreo Addition:
Add the chopped Oreos to the blender. Pulse in short bursts until combined—be careful not to over-blend! This will ensure you have those delicious cookie chunks for texture throughout the shake.Adjust Consistency:
If the milkshake is too thick for your liking, add a little more milk, one tablespoon at a time, and blend again. If it’s too runny, pop in a bit more ice cream and blend until smooth.Serve:
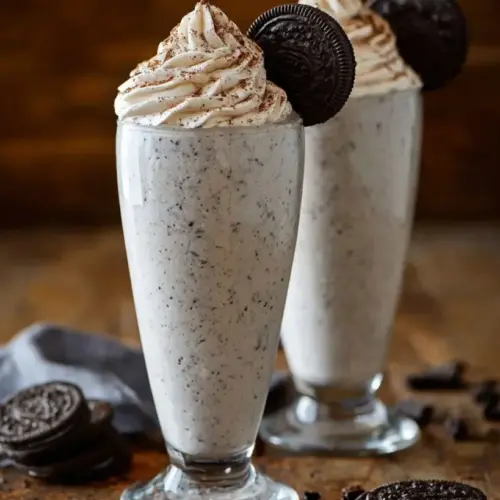
Pour your Oreo milkshake into tall glasses. Don’t forget to use a big straw! Top with whipped cream and sprinkle with extra Oreo pieces or a drizzle of chocolate syrup for an extra special touch.Enjoy Immediately:
The sooner you sip, the better. That’s where the magic happens!
Chef’s Tips:
- Timing: Aim to blend for 30-60 seconds at step 2 for the ideal consistency.
- Visual Cues: The ice cream should be creamy, with chunks of Oreos visible but not entirely blended.
- Common Mistakes: Avoid adding all of your milk at once. It’s easier to thicken the shake than to thin it down!
Expert Tips & Tricks
Quality Ingredients Matter: Always choose a high-fat, creamy ice cream for the best results. Look for ice creams with minimal ingredients for a classic taste.
Store Leftover Shake: If you happen to have any leftover milkshake (unlikely, but just in case!), keep it in a covered container for about 1-2 days in the freezer.
Make Ahead: If you’re entertaining, prepare the milkshake mix (ice cream, milk, vanilla) in the blender and store it in the fridge for up to an hour before serving, then blend with Oreos when you’re ready.
Tackle Common Problems: If your shake is too thick, add milk slowly to avoid making it too runny. For a lumpy shake, ensure the ice cream is adequately softened before placing it in the blender.
Perfect Presentation: Serve in chilled glasses to keep your milkshake cold for longer.
Extra Cooling: If it’s a particularly hot day, chill your glasses in the freezer for a few minutes before pouring the milkshake; it adds that extra frosty touch.
Serving Suggestions
Serve your Oreo milkshake alongside a warm slice of chocolate cake or a simple plate of fresh cookies. For a fun presentation, garnish your glass with a sprinkle of Oreo crumbs or a swirl of chocolate syrup. Perfect for birthday parties or a cozy movie night, this milkshake is sure to impress!
Variations & Substitutions
- Flavor Twists: Try swapping out the vanilla ice cream for chocolate or mint chocolate chip for an exciting twist!
- Dietary Options: For a lactose-free version, use dairy-free ice cream and almond or oat milk. Gluten-free Oreos are available for those avoiding gluten.
- Seasonal Options: During the holidays, add a hint of peppermint extract or mix in some fall spices for a festive touch.
Nutrition & Storage Info
- Prep Time: 10 minutes
- Cook Time: 0 minutes
- Total Time: 10 minutes
- Yield: 2 servings
- Estimated Calories: Approximately 350-400 per serving (varies based on toppings and specific ingredients)
Storage Instructions: Best enjoyed fresh! If stored, keep in the freezer for up to two days. If the shake becomes too hard, let it sit at room temperature for a few minutes to soften before enjoying.
FAQ Section
Can I make this milkshake without ice cream?
Yes! You can use yogurt for a lighter version, but the texture will be different.Can I add protein powder?
Absolutely! Just remember to balance it with extra milk servings to maintain a creamy texture.Are there gluten-free Oreos?
Yes! Gluten-free Oreos are available and will work just as wonderfully in this recipe.What alternative sweeteners can I use?
You can use honey or maple syrup, but keep in mind this may change the flavor slightly.What’s the best way to crush Oreos?
You can place them in a zip-lock bag and use a rolling pin, or pulse them in a food processor until you reach your desired chunkiness.Can I use flavored Oreos?
Yes! Using different flavored Oreos can create unique and delicious variations of this milkshake.Why does my milkshake separate?
This can happen if it’s made too far in advance. Always give it a quick stir or shake before serving.How can I make this milkshake thicker?
Blend less milk with more ice cream for a thicker consistency.Can I add fun mix-ins?
Sure! Try adding mini chocolate chips or crushed candies for an extra treat.How should I drink it?
Grab a big straw, or even a spoon! You don’t want to miss the delicious bits of Oreo at the end.

Conclusion
This Oreo milkshake recipe is not just a drink; it’s a joyful experience that brings back cherished memories and creates new ones with every sip. I hope you’re inspired to whip one up and share it with your family and friends! Don’t forget to drop a comment below sharing your thoughts or any tweaks you made.
For more delicious recipes like this, explore my other posts, and let’s continue this fantastic journey of flavor together!
Happy blending!
Oreo Milkshake
Ingredients
Main Ingredients
- 2 cups vanilla ice cream, softened slightly Let your ice cream soften at room temperature for 10-15 minutes before using.
- 1/2 cup whole milk Whole milk offers the best creaminess. Substitute with 2% for a lighter version.
- 6-8 cookies Oreo cookies, roughly chopped Feel free to crush your Oreos into different sizes for texture.
- 1/2 teaspoon vanilla extract Use high-quality vanilla extract to enhance the flavor.
Optional Toppings
- whipped cream Store-bought or homemade, for topping.
- Oreo cookies For sprinkling on top.
- chocolate syrup For drizzling on top.
Instructions
Preparation
- Start by letting your vanilla ice cream sit at room temperature until it's slightly softened, about 10-15 minutes.
Blending
- Place the softened ice cream, milk, and vanilla extract into your blender. Blend on high speed until smooth and creamy, approximately 30-60 seconds.
- Add the chopped Oreos to the blender. Pulse in short bursts until combined—be careful not to over-blend!
- If the milkshake is too thick, add more milk, one tablespoon at a time, blending after each addition.
Serving
- Pour your Oreo milkshake into tall glasses and top with whipped cream and extra Oreo pieces or chocolate syrup as desired.
- Enjoy your milkshake immediately for the best experience.