
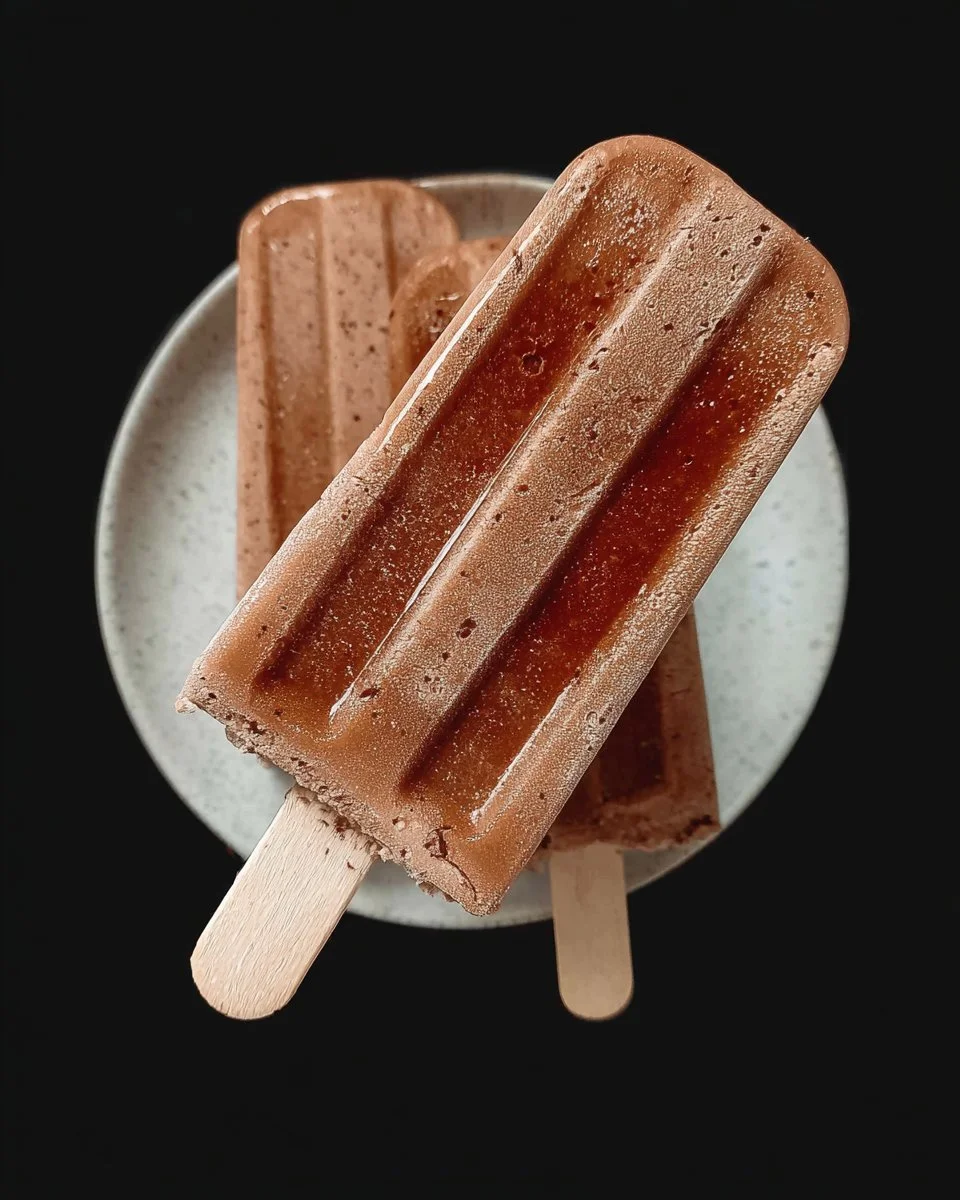
Irresistible Fudgesicle: The Ultimate Guilt-Free Chocolate Treat
Growing up, summer meant one thing: Fudgesicles. I can vividly remember the sound of ice cream trucks jingling down the street, signaling a glorious escape from the blistering heat. Those rich, chocolatey pops made me feel like a kid again, indulging carefree in that velvety goodness. Over the years, I’ve tried store-bought varieties that just don’t capture that same nostalgic magic. That’s why I set out to create my own recipe that not only brings back all those fond memories but is also packed with nutrition. This creamy, chocolatey treat offers the indulgence of a traditional Fudgesicle while being a guilt-free option thanks to a wholesome ingredient list.
In this recipe, I’ll share how easy it is to whip up your own Fudgesicles using just a few ingredients, including coconut milk and protein powder, to give you that creamy richness without the added sugars and preservatives of the store-bought kind. Plus, I promise to spill my little secrets to get the perfect texture every time. So grab your blender, and let’s dive into the delicious world of homemade Fudgesicles!
What Are Fudgesicles?
Fudgesicles have a delightful history that dates back to the early 20th century. A frozen treat resembling an ice cream bar, they became a summer staple for families everywhere, cherished for their indulgent taste and creamy texture. Unlike traditional ice cream, Fudgesicles offer a unique blend of smooth chocolate, which melts beautifully in your mouth, leaving a lingering sweetness that quenches any chocolate craving.
What makes these frozen delights so unique is their versatility. Whether you want to enjoy them as an afternoon pick-me-up or as an after-dinner dessert, Fudgesicles are the perfect treat year-round. They transform simple ingredients into a decadent experience that feels indulgent yet surprisingly healthy.
Why You’ll Love This Recipe
Nostalgic Flavor: This recipe captures that classic Fudgesicle taste you remember but in a healthier package, using wholesome ingredients.
Budget-Friendly: Making your own Fudgesicles is incredibly cost-effective. A single can of coconut milk paired with protein powder gives you multiple pops that are often cheaper than buying pre-packaged treats.
Customization Galore: Want to jazz things up? Add your favorite flavors! Whether it’s a splash of vanilla extract, a sprinkle of sea salt, or even a hint of mint—let your creativity soar!
Easy to Make: You don’t need any fancy kitchen gadgets or skills. With just a blender and popsicle molds, you can create delightful treats in no time.
Nutrient-Packed: Unlike many store-bought options, this recipe allows you to control the ingredients, making it easy to create a deliciously satisfying Fudgesicle that packs a protein punch and is free from refined sugars.
I’ve made these countless times, and each batch never fails to impress both family and friends alike. In just a matter of hours, you can have delicious homemade Fudgesicles that keep everyone coming back for more!
Ingredients Section
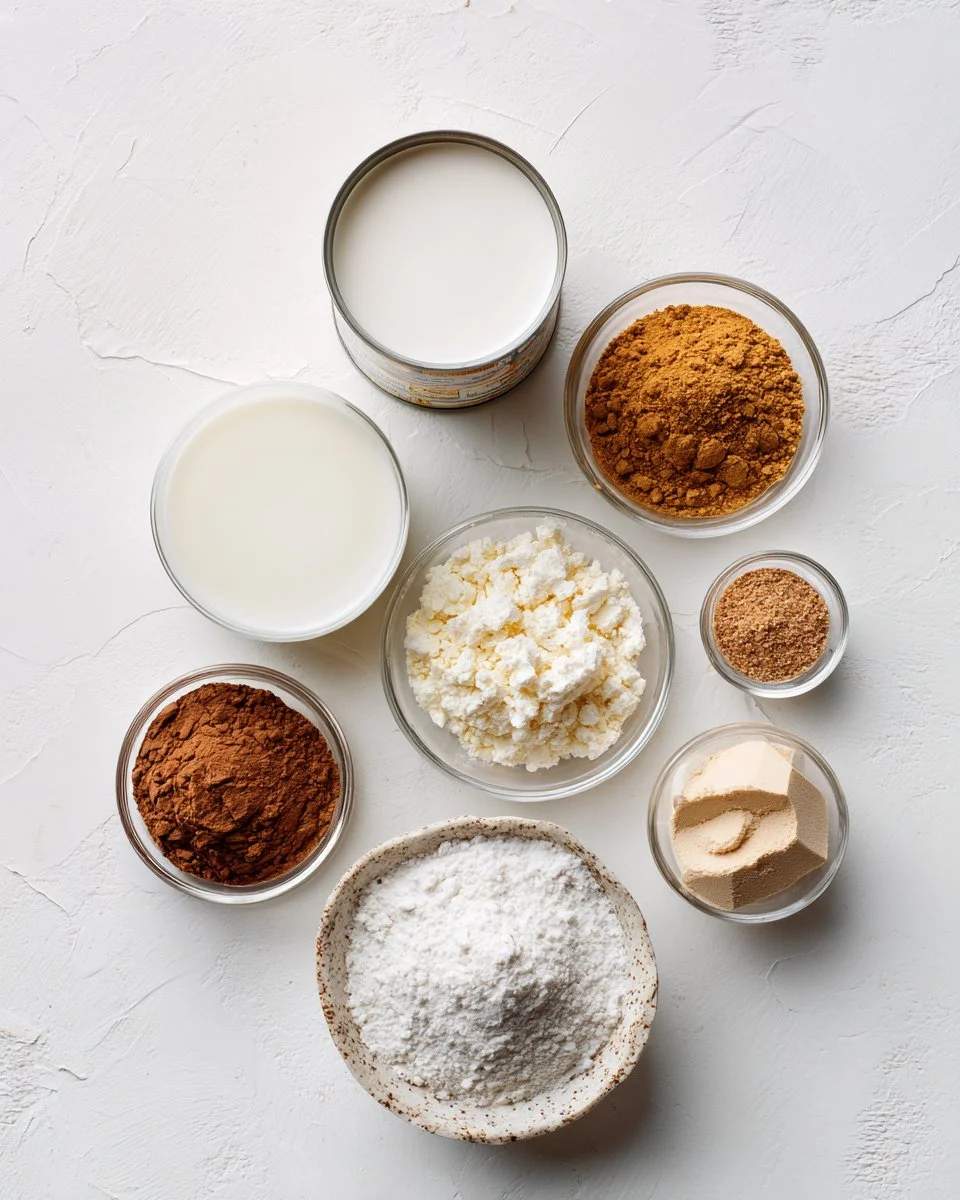
To create these delicious Fudgesicles, here’s what you’ll need:
- 1 can coconut milk (full-fat is best for creaminess. You can use light coconut milk for fewer calories or dairy milk for a different flavor.)
- 2 scoops protein powder (I prefer Vital Proteins for its smooth blendability)
- Sweetener (to taste; consider honey, maple syrup, or stevia)
- Vanilla extract (optional, for additional flavor)
- Pinch of sea salt (to enhance chocolate richness)
- Cocoa powder (for an extra chocolate burst)
Prep Notes:
- Make sure your coconut milk is at room temperature for easy blending. This helps everything combine smoothly without lumps.
Step-by-Step Instructions
Blend the Base: Add the coconut milk and protein powder to a blender. Combine these ingredients until fully mixed, about 1 minute. If you’re using sweetener or vanilla extract, add those in now as well!
Pour into Molds: Carefully pour the mixture into popsicle molds, filling them about ¾ full to allow for expansion when frozen.
Insert Sticks: Add popsicle sticks into the molds. If your mold doesn’t allow for sticks to stabilize while freezing, freeze for about 1 hour first before adding.
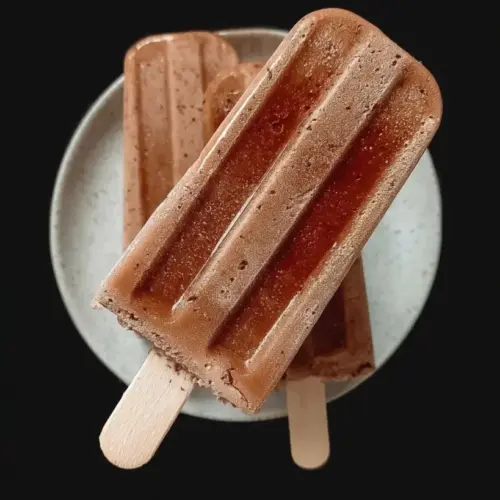
Freeze Overnight: Freeze the molds overnight for the best results. This allows the Fudgesicles time to set fully, ensuring a creamy texture.
Remove and Serve: Once frozen, to remove the popsicle from the molds, run warm water over the outer edges for about 10 seconds. Gently press up from the bottom. Enjoy your homemade Fudgesicles!
Chef’s Tips
- Visual Cues: When blending, look for a silky texture without lumps; this ensures that your Fudgesicles will be smooth.
- Common Mistake: Avoid overfilling the molds; they need space to expand.
- Professional Technique: If you want a layered effect, freeze the first layer before adding more of the mixture on top.

Expert Tips & Tricks
Awakening Chocolate Flavors: To elevate the chocolate flavor, consider adding a tablespoon of espresso powder—binds perfectly without overpowering sweetness.
Storage Recommendations: Store your Fudgesicles in a freezer-safe bag or container layered with parchment paper to prevent sticking.
Make-Ahead Instructions: Double the recipe so you always have a stock of Fudgesicles waiting for you during those hot days.
Troubleshooting: If your Fudgesicles are too hard to pull from the mold, they might need a few more seconds under warm water.
Experiment: Don’t shy away from trying different sweeteners to adapt to your palate!
Serving Suggestions
These Fudgesicles pair wonderfully with fresh fruit like strawberries or bananas for a burst of freshness. You can also serve them on a lovely summer day while hosting a barbecue or picnic, impressing your guests with a premium homemade treat. Present them on a colorful platter, garnish with mint leaves, and drizzle with melted dark chocolate for an Instagram-worthy creation!
Variations & Substitutions
Flavor Combinations: Mix in some peanut butter for a rich twist, or throw in some crushed cookies for texture!
Dietary Adaptations: For vegan options, stick with plant-based protein powders and sweeteners like agave. Dairy-free options ensure that everyone can enjoy this treat.
Seasonal Variations: In fall, add pumpkin spice for a festive feel, or in spring, substitute half the cocoa with fresh strawberries to brighten up the flavor profile!
Nutrition & Storage Info
- Prep Time: 10 minutes
- Cook Time: No cooking required
- Total Time: 10 minutes + freezing time
- Yield: Approximately 6 pops
- Estimated Calories: 120 calories per serving
- Storage Instructions: Keep them in the freezer for up to three months for optimal freshness.
FAQ Section
Can I use other non-dairy milk?
Yes, almond milk and cashew milk work well, although they may yield a different texture.How do I avoid ice crystals in my Fudgesicles?
Ensure a smooth blend and freeze quickly to prevent large crystals from forming.Can I increase the protein content?
Absolutely! Just add more protein powder, but be cautious as it may alter the texture.What can I substitute for coconut milk?
Dairy milk or any other dairy alternative can be used, but for the creamy texture, coconut or cashew milk is recommended.Can these Fudgesicles be made without added sweeteners?
Yes, the natural sweetness from coconut milk can suffice, especially if you use ripe bananas in place of some coconut milk.How do I adjust this recipe for kids?
You can sweeten to taste and include their favorite fruits for a fun twist!What’s the best way to store leftovers?
Keep them in an airtight container in the freezer.Can I use flavored protein powder?
Yes, vanilla or chocolate flavored protein powder can enhance the overall taste.How long does it take to freeze these?
For the best results, freezing overnight is ideal, but they should set in about 4-6 hours for quicker versions.Can I make mini Fudgesicles?
Definitely! Adjust the freezing time according to the size of your molds.
Conclusion
In the world of icy treats, homemade Fudgesicles shine with their creamy texture and nostalgic flavor, all while being a healthier option that you can feel good about indulging in. I hope you give this recipe a try and perhaps feel that same warmth and joy I did as a kid. Can’t wait to hear how your Fudgesicles turn out! Leave your thoughts or suggestions in the comments below, and don’t forget to check out more delicious recipes on the blog, like my homemade sorbets or smoothie pops! Here’s to sweet memories and delightful moments!
Fudgesicle
Ingredients
Base Ingredients
- 1 can coconut milk Full-fat is best for creaminess. Light coconut milk can be used for fewer calories or dairy milk for a different flavor.
- 2 scoops protein powder Preferably Vital Proteins for its smooth blendability.
- to taste sweetener Consider honey, maple syrup, or stevia.
- 1 teaspoon vanilla extract Optional, for additional flavor.
- pinch sea salt Enhances chocolate richness.
- 2 tablespoons cocoa powder For an extra chocolate burst.
Instructions
Preparation
- Blend the coconut milk and protein powder in a blender until fully mixed, about 1 minute. If using sweetener or vanilla extract, add those in now.
- Pour the mixture into popsicle molds, filling them about ¾ full to allow for expansion when frozen.
- Insert popsicle sticks into the molds. If your mold doesn’t allow for sticks to stabilize, freeze for about 1 hour first before adding.
- Freeze overnight for the best results to ensure a creamy texture.
- To remove the popsicles from the molds, run warm water over the outer edges for about 10 seconds and gently press from the bottom.
- Enjoy your homemade Fudgesicles!