

Delightful Red Velvet Crinkle Cookies: The Perfect Festive Treat!
There’s something magical about the scent of freshly baked cookies wafting through the kitchen. For me, it conjures up memories of my grandmother, who would gather the family each holiday season for a baking extravaganza. Amidst the flour, sugar, and laughter, we would whip up batch after batch of cookies, but one stood out—the vibrant, melt-in-your-mouth Red Velvet Crinkle Cookies. These cookies have an unbeatable combination of rich cocoa flavor and a striking red hue that instantly brightens up any festive occasion.
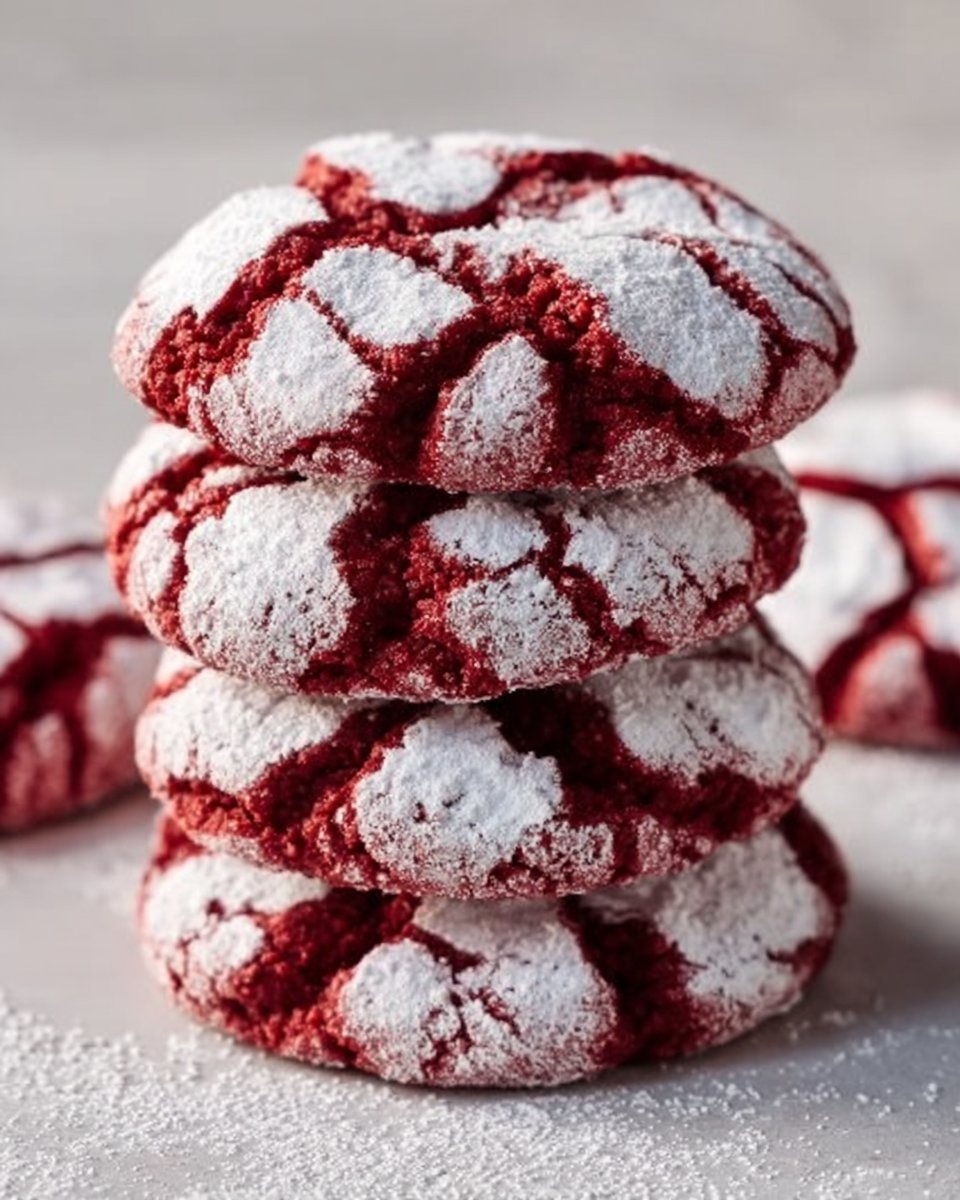
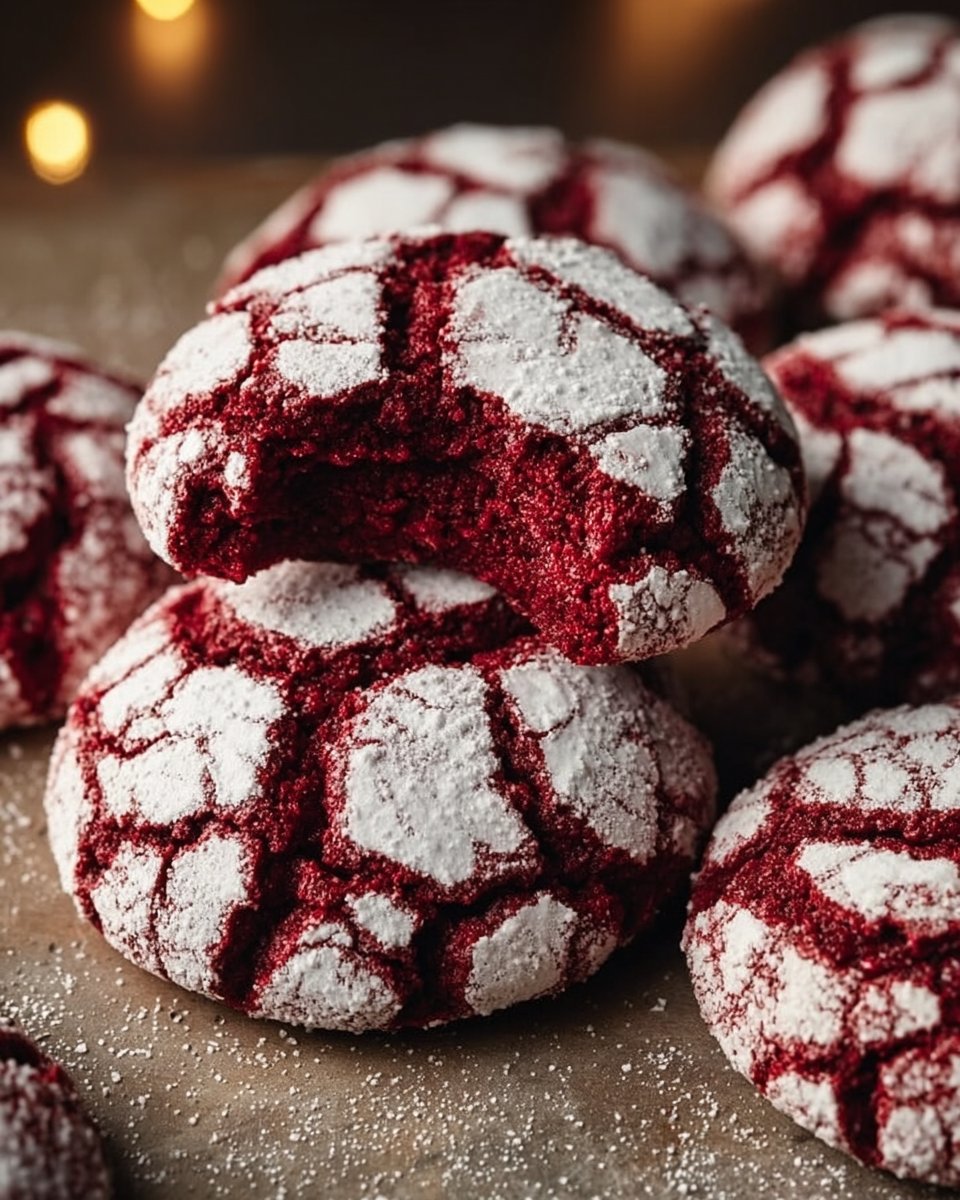
What makes my Red Velvet Crinkle Cookies special is not just their appearance but their texture and taste. Unlike the ones you might find in the store, which often lack moisture and depth, my recipe promises soft, chewy centers hugged by a delicate, crinkly exterior dusted in powdered sugar. They make the perfect addition to any holiday spread or a cozy night in with a good book. In this post, you’ll learn how to elevate your cookie game with tips and tricks I’ve gathered over the years, ensuring every batch comes out beautifully. So, let’s dive into this delightful recipe that guarantees not only delicious cookies but also heartwarming memories!
What Are Red Velvet Crinkle Cookies?
Red Velvet Crinkle Cookies are a delightful twist on traditional red velvet cake, transformed into soft, chewy cookies with a signature crinkly top. Originating from the South, red velvet cake made its mark in American dessert culture due to its rich red color and velvety texture, typically enhanced with cocoa powder and buttermilk.
These cookies embody all the characteristics that make red velvet treats so beloved. Each bite boasts a harmonious blend of soft sweetness and just the right amount of chocolate, enveloped in a slightly crisp surface. The lively red color, which glistens against the white powdered sugar coating, makes them a visually stunning treat perfect for any occasion—be it Christmas, Valentine’s Day, or just because you deserve a treat!
You might want to whip these up for holiday gatherings, birthday parties, or any time you’re in need of a joyous pick-me-up. Trust me; they will not only delight your taste buds but also become a cherished recipe in your collection.
Why You’ll Love This Recipe
Unmatched Taste and Texture: Unlike the lackluster store-bought cookies that often leave you underwhelmed, my Red Velvet Crinkle Cookies offer a rich cocoa flavor combined with that divine soft center and crinkly finish that you can’t resist.
Cost-Effective: You’ll save money by making these beauties at home. A batch can cost a fraction of what you’d spend at a bakery, with the added joy of freshness and personal touch.
Customization Options: Want to up the ante? Feel free to add white chocolate chips or nuts for a delightful twist, or even swap out the red food coloring for colors more suited to other festivities!
Simple to Make: This cookie recipe is approachable for bakers of all skill levels. With just a few mixing and chilling steps, you’ll have delicious cookies ready to go in no time.
Perfect for Any Occasion: Whether you’re hosting a party, bringing dessert to a gathering, or simply indulging at home, these cookies add a festive flair wherever they go. You can also package them beautifully for gifts!
Ingredients
These Red Velvet Crinkle Cookies are made with simple, high-quality staples that you probably already have on hand! Here’s what you need:
- 2 cups all-purpose flour (I prefer King Arthur Flour for its consistency)
- 1/2 cup unsweetened cocoa powder (Dutch-processed cocoa gives a deeper flavor)
- 1 teaspoon baking powder
- 1/2 teaspoon baking soda
- 1/4 teaspoon salt
- 1 cup granulated sugar
- 1/2 cup brown sugar (light or dark, I love using light for a milder taste)
- 3/4 cup vegetable oil (You can substitute with canola oil)
- 2 large eggs (room temperature for better mixing)
- 1 teaspoon vanilla extract
- 1 tablespoon red food coloring (look for gel food coloring for vibrancy)
- Powdered sugar for rolling (always use freshly sifted for a light dusting)
Make sure to have your ingredients prepped beforehand! Room temperature eggs blend more effectively, and sifting powdered sugar can prevent clumping and ensure even coverage on your cookies.
Step-by-Step Instructions
Preheat the oven: Begin by preheating your oven to 350°F (175°C) and lining a baking sheet with parchment paper. This will help prevent sticking and promote even baking.
Mix Dry Ingredients: In a mixing bowl, whisk together the flour, cocoa powder, baking powder, baking soda, and salt until well combined. Set aside.
Combine Wet Ingredients: In another bowl, whisk together the granulated sugar, brown sugar, and vegetable oil until smooth and well-mixed.
Add Eggs and Color: Beat in the eggs, vanilla extract, and red food coloring to the sugar mixture until fully combined and smooth.
Combine All Ingredients: Gradually stir the dry ingredients into the wet mixture until just combined. Be careful not to over-mix; you want to maintain that soft texture!
Chill the Dough: Cover the bowl with plastic wrap and chill the dough in the refrigerator for about 30 minutes. This step is essential for achieving that perfect crinkle and preventing the cookies from spreading too much during baking.
Form Cookies: Once chilled, scoop tablespoon-sized portions of dough and roll them into balls using your hands.
Coat in Sugar: Roll each ball in powdered sugar until well coated; it will provide that signature look and a delightful sweetness to each bite!
Bake: Place the balls on the prepared baking sheet, leaving space between each. Bake for 12-14 minutes, or until the edges are set and the tops are crinkly.
Cool: Allow the cookies to cool on the baking sheet for about 3-5 minutes before transferring them to a wire rack to cool completely. This helps them firm up and makes transferring easier.
Enjoy your festive Red Velvet Crinkle Cookies!
Expert Tips & Tricks
Use Quality Ingredients: The flavor of your cookies greatly depends on the quality of the cocoa and vanilla extract. Don’t skimp on these! I’ve found that real vanilla extract makes a world of difference.
Chill Your Dough: If you’re in a warm climate, consider chilling the dough longer. A firm dough is key to achieving those beautiful crinkles!
Storage Recommendations: These cookies can be stored at room temperature in an airtight container for up to a week. For longer storage, freeze them individually wrapped for up to 3 months.
Make-Ahead Instructions: You can prepare the dough ahead of time, chill it, and freeze it before rolling in powdered sugar. Just thaw and roll before baking!
Troubleshooting: If your cookies spread too much, it might be due to warm dough—try chilling longer before baking next time!
Serving Suggestions
Serve these delightful cookies alongside a glass of milk for a nostalgic treat, or add a scoop of vanilla ice cream for an indulgent dessert. For presentation, arrange them on a festive platter with some holiday-themed decorations or wrap them up in clear bags with a colorful ribbon for gifting. These cookies are perfect for Christmas cookie exchanges, Valentine’s Day sweet treats, or simply as an afternoon pick-me-up!
Variations & Substitutions
Don’t be afraid to get creative with these cookies! You can add:
- White Chocolate Chips: For a creamy contrast against the rich cocoa.
- Peppermint Extract: Perfect for a holiday twist—just use ½ teaspoon!
- Nut Allergy Adaptations: Omit any nuts for safe consumption, or try sunflower seed butter in place of oils for a unique flavor.
- Seasonal Colors: Swap the red food coloring for green or blue for St. Patrick’s Day or your favorite sports team!
Nutrition & Storage Info
- Prep Time: 15 minutes
- Cook Time: 12-14 minutes
- Total Time: 45 minutes (including chilling)
- Yield: About 24 cookies
- Estimated Calories: Approximately 120 calories per cookie
- Storage Instructions: Store at room temperature in an airtight container for up to 1 week, or freeze for up to 3 months.
FAQ Section
Can I use different types of flour?
Yes! However, results may vary. Use a blend designed for baking for best outcomes—check for instructions specific to your blend.What do I do if my dough is too sticky?
If it feels too sticky, chill it longer. You want a dough that’s easy to roll, but not too wet.Can I use milk instead of vegetable oil?
No, vegetable oil is used for moisture and the right texture. Milk won’t create the same effect.Is this recipe gluten-free?
You can try substituting the all-purpose flour with a gluten-free blend, but the texture might change.Can I make these ahead of time?
Absolutely! The dough can be made ahead and stored in the fridge for up to 2 days or frozen for longer.What can I substitute for red food coloring?
Beet juice or a natural red powder can provide color, although the shade may be less vivid.Why didn’t my cookies crinkle?
This could happen if the dough was not chilled enough or if it was over-mixed. Make sure to chill and mix gently.How do I know when they’re done baking?
They should be set around the edges but still soft in the middle. They will firm up as they cool.What’s the best way to freeze these cookies?
Allow cookies to cool completely then wrap them individually in plastic wrap and place them in a freezer bag.Can I add nuts to the dough?
Yes! Chopped walnuts or pecans would complement the flavor. Just fold them in gently at the end.
Conclusion
These Red Velvet Crinkle Cookies are not just a treat; they’re a delightful experience that brings back warmth and nostalgia. With their rich taste and beautiful appearance, they’re sure to make lasting memories, just as they have in my family. I encourage you to try these out in your kitchen and share your thoughts; I would love to hear how they turned out for you! For more sweet recipes and delights, explore my blog—it’s filled with joy and deliciousness waiting to be baked! Happy baking!
Red Velvet Crinkle Cookies
Ingredients
Dry Ingredients
- 2 cups all-purpose flour I prefer King Arthur Flour for its consistency.
- 1/2 cup unsweetened cocoa powder Dutch-processed cocoa gives a deeper flavor.
- 1 teaspoon baking powder
- 1/2 teaspoon baking soda
- 1/4 teaspoon salt
Wet Ingredients
- 1 cup granulated sugar
- 1/2 cup brown sugar Light or dark; I love using light for a milder taste.
- 3/4 cup vegetable oil Can substitute with canola oil.
- 2 large eggs Room temperature for better mixing.
- 1 teaspoon vanilla extract Use real vanilla for best flavor.
- 1 tablespoon red food coloring Gel food coloring is preferred for vibrancy.
- Powdered sugar for rolling Powdered sugar for rolling Always use freshly sifted for a light dusting.
Instructions
Preparation
- Preheat your oven to 350°F (175°C) and line a baking sheet with parchment paper.
- In a mixing bowl, whisk together the flour, cocoa powder, baking powder, baking soda, and salt until well combined. Set aside.
- In another bowl, whisk together the granulated sugar, brown sugar, and vegetable oil until smooth and well-mixed.
- Beat in the eggs, vanilla extract, and red food coloring to the sugar mixture until fully combined and smooth.
- Gradually stir the dry ingredients into the wet mixture until just combined; do not over-mix.
- Cover the bowl with plastic wrap and chill the dough in the refrigerator for about 30 minutes.
- Once chilled, scoop tablespoon-sized portions of dough and roll them into balls.
- Roll each ball in powdered sugar until well coated.
Baking
- Place the balls on the prepared baking sheet, leaving space between each.
- Bake for 12-14 minutes, or until the edges are set and the tops are crinkly.
- Allow the cookies to cool on the baking sheet for 3-5 minutes before transferring them to a wire rack.
Serving
- Serve alongside a glass of milk or add a scoop of vanilla ice cream.