
Are you ready to bring a taste of Japan into your kitchen with a delicious portable snack? Look no further than Onigiri with Spicy Tuna. This recipe is perfect for those who crave a healthy, flavorful, and easy-to-make meal that doubles as a quick lunch idea or a satisfying snack. In this comprehensive guide, you’ll learn everything you need to know—from how to make Onigiri with spicy tuna to tips for customizing your rice balls to perfection. Whether you’re a seasoned chef or a beginner in Japanese recipes, this step-by-step guide will empower you to create your own Spicy Tuna Onigiri that’s flavorful.

Table of Contents
Why You’ll Love Onigiri with Spicy Tuna
Creating your own Onigiri with Spicy Tuna at home isn’t just a fun culinary adventure—it’s a way to enjoy a versatile, nutritious meal that fits perfectly into your busy lifestyle. Here’s why you’ll fall in love with this recipe:
Perfect for Families and Busy Lifestyles
Imagine preparing a meal that is both satisfying and convenient. Whether packing lunch for work, school or a quick snack on the go, Onigiri with Spicy Tuna offers a delightful combination of flavors and textures that everyone will love. Its portability makes it an ideal option for busy families and anyone looking for a fast yet nutritious meal. The rice balls are easy to pack and eat and offer a burst of umami with every bite.
Nutritional Benefits and Simple Ingredients
This recipe is not only delicious but also packed with nutritional benefits. You’re making a meal balanced in carbohydrates, protein, and healthy fats using fresh, high-quality ingredients, such as tender sushi rice, spicy tuna filling, and nutritious seaweed. With no artificial additives and a focus on natural flavors, this Japanese Onigiri Recipe is a wholesome alternative to many processed fast-food options. It’s a great way to boost energy levels while enjoying a tasty, nutrient-rich meal.
Flexibility and Adaptability for Every Palate
One of the best features of this recipe is its incredible versatility. You can easily adjust the spice level of the tuna filling, experiment with different types of rice, or try out various fillings to suit your taste. Whether you prefer a milder version or an extra kick of heat, this Easy Onigiri Recipe allows you to customize every aspect. Plus, it’s budget-friendly and accessible for everyone—from students to busy professionals.
Essential Ingredients for the Recipe
A fantastic Onigiri with Spicy Tuna starts with the finest ingredients. Here’s a breakdown of the must-haves for creating the perfect rice ball:
Ingredients:
- 2 cups sushi rice
- 2 1/2 cups water
- 1/4 cup rice vinegar
- 1 tbsp sugar
- 1 tsp salt
- 1 can tuna (drained)
- 1 tbsp mayonnaise
- 1 tsp sriracha (adjust to taste)
- 2 sheets nori (cut into strips)
- Sesame seeds (optional, for garnish)

Sushi Rice – The Foundation of Onigiri
Sushi rice is the heart of any onigiri. It provides the sticky texture needed to hold the rice balls together and absorb the flavors of the filling. When selecting your rice, look for short-grain or medium-grain varieties specifically meant for sushi. If you prefer a slightly healthier twist, mix a portion of brown rice with white sushi rice for added fiber and nutrients.
Fresh Tuna – The Spicy Filling Star
For the spicy tuna filling, opt for sushi-grade tuna that is both fresh and flavorful. The quality of the tuna directly impacts the overall taste of your Onigiri, so choose a supplier you trust. If you’re looking for alternatives, you can experiment with other types of seafood or even a plant-based substitute if you follow a vegetarian diet. The key is to ensure that the tuna is finely chopped and well-seasoned to create that perfect balance of spice and savory taste.
Seaweed (Nori) – The Savory Wrap
Seaweed, or nori, is traditional Japanese cuisine and adds a wonderful umami flavor and texture to your Onigiri. It’s used as a wrap around the rice ball or as a garnish. When selecting seaweed, choose high-quality sheets that are crisp and have a rich, deep flavor. You can also explore flavored varieties if you’re feeling adventurous.
Spices, Sauces, and Seasonings
You’ll need a mix of simple yet essential seasonings to bring everything together. Soy sauce, sesame oil, sriracha, or your favorite hot sauce create a spicy, tangy marinade for the tuna. Some mayonnaise is often added to bind the flavors and achieve a creamy consistency. These ingredients enhance the tuna and provide a well-rounded flavor profile for the entire dish.
Ingredient Preparation
Preparation is key to achieving your Spicy Tuna Onigiri’s perfect texture and flavor balance. Follow these steps to ensure everything is ready for assembly:
Preparing the Sushi Rice
Begin by rinsing the sushi rice under cold water until the water runs clear. This step removes excess starch, ensuring that your rice cooks to a perfect sticky consistency. Once rinsed, cook the rice according to the package instructions—whether you’re using a rice cooker or a pot on the stove, follow the correct water-to-rice ratio. After cooking, while the rice is still warm, gently fold in a mixture of rice vinegar, sugar, and salt. This not only adds a subtle tanginess but also helps to keep the rice sticky and flavorful.
Mixing the Spicy Tuna Filling
While your rice is cooling, prepare the spicy tuna filling. Finely chop the sushi-grade tuna into small, bite-sized pieces. In a mixing bowl, combine the tuna with a drizzle of soy sauce, a squirt of sriracha (adjust based on your spice preference), a dollop of mayonnaise, and a few drops of sesame oil. Mix the ingredients well to ensure that each piece of tuna is evenly coated with the seasoning. Consider adding a sprinkle of finely chopped green onions or a dash of lemon juice to brighten the taste.
Preparing the Seaweed and Additional Garnishes
Cut your nori sheets into strips or squares, depending on how you plan to incorporate them into your Onigiri. If you prefer a wrapped onigiri, cut the seaweed into pieces that encase your rice ball completely. Alternatively, keep the seaweed whole or in decorative strips to garnish your Onigiri. Gather any additional garnishes—such as sesame seeds, pickled ginger, or chopped scallions—and set them aside so that everything is within reach when you assemble your Onigiri.
Step-by-Step Cooking Instructions
Now that all your ingredients are prepped, it’s time to assemble your Onigiri with Spicy Tuna. Follow these detailed instructions for a foolproof assembly:
Step 1 – Initial Preparation and Setting the Stage
Start by placing a bowl of water with salt on your workspace. This “wet hand” technique prevents sticky sushi rice from clinging to your hands while you shape the Onigiri. Also, prepare a clean surface or a bamboo mat to work on if you have one. Gather all your pre-cooked sushi rice, spicy tuna filling, and seaweed so everything is easily accessible.
Step 2 – Assembling the Onigiri
Take a handful of the warm sushi rice in your wet hand. Flatten it slightly to create a small indent in the center. Spoon a generous amount of the spicy tuna filling into this indent, then gently fold the rice around the filling. Using your hands, carefully mold the rice into a triangle or oval shape—traditionally, Onigiri is triangular, but you can experiment with different shapes. Press lightly once the rice completely encloses the filling to ensure the Onigiri holds together.
Step 3 – Adding the Finishing Touches
After shaping the Onigiri, it’s time to add your final touches. Wrap a strip of nori around the Onigiri, or place a piece on top as a garnish. This adds a burst of umami flavor and gives your rice ball a classic, authentic look. For an extra layer of flavor, sprinkle a few sesame seeds or drizzle more soy sauce over the finished product. Your Spicy Tuna Onigiri is now ready to be served!
Tips for an Even Tastier Version
While the basic recipe is delicious on its own, here are some expert tips and variations to elevate your Onigiri with Spicy Tuna to new heights:
Adding Extra Ingredients for a Flavor Boost
Experiment by adding extra ingredients to your spicy tuna filling. Consider mixing in finely chopped avocado for creaminess or adding a bit of diced cucumber for a refreshing crunch. Other great additions include a dash of wasabi for an extra kick or finely sliced radish for a peppery note. These small tweaks can create exciting variations like Spicy Tuna-Stuffed Igiri with a twist.
Techniques to Enhance Flavor and Texture
Marinate the tuna in your seasoning mix for 10–15 minutes before assembling the Onigiri for a more pronounced flavor. This allows the spices to penetrate the fish, intensifying the overall taste. Additionally, lightly toasting your seaweed before use can bring out a more prosperous, deeper flavor profile that complements the freshness of the tuna.
Adjustments for Personal Preferences
The beauty of Onigiri lies in its adaptability. If you prefer a less spicy version, reduce the sriracha or add more mayonnaise to mellow the heat. Alternatively, if you like a more potent flavor punch, consider increasing the amount of soy sauce or adding a splash of rice vinegar for extra tanginess. Feel free to experiment with the ratio of ingredients until you achieve the perfect balance that suits your taste.
Recipe Variations and Adaptations
The classic Onigiri with Spicy Tuna is just the beginning. Here are some creative adaptations to cater to different dietary needs and flavor preferences:
Vegetarian Option
For those who prefer a vegetarian version, substitute the spicy tuna filling with a mixture of marinated tofu or finely chopped mushrooms. Season with soy sauce, sesame oil, and a touch of sriracha to mimic the spicy, savory notes of the original recipe. Add finely diced avocado or edamame for extra texture and flavor.
Gluten-Free or Low-Carb Option
Most onigiri recipes are naturally gluten-free since they are made with rice. However, if you’re looking for a low-carb alternative, try using cauliflower rice as a substitute. Although it won’t provide the same traditional texture, it offers a lighter option for those on a low-carb diet. Reduce the rice by making mini Onigiri for a bite-sized, portion-controlled snack.
Other Adaptations Based on Seasons or Occasions
Adapt your Onigiri to reflect seasonal ingredients or special occasions. In the summer, add diced mango or cucumber to the filling for a refreshing twist. During the colder months, add a sprinkle of toasted sesame seeds or finely chopped scallions to give the dish an extra burst of warmth and flavor. This recipe’s flexibility allows you to explore a wide variety of Onigiri Filling Ideas that cater to your mood and season.
Serving Suggestions
Onigiri with Spicy Tuna is versatile and can be enjoyed in many settings. Here are some serving ideas to inspire you:
Salad or Soup Ideas for a Light Starter
Pair your Onigiri with a light miso soup or a refreshing seaweed salad for a complete Japanese-inspired meal. The contrast between the warm, savory rice balls and a cool, crisp salad creates a balanced dining experience perfect for lunch or dinner.
Hearty Sides for a Filling Meal
For a more substantial meal, serve your Onigiri alongside other Japanese dishes such as tempura vegetables, edamame, or a simple bowl of ramen. This pairing transforms your Onigiri into a centerpiece that can be enjoyed as a multi-course meal.
Drink Recommendations for a Balanced Meal
Enhance your dining experience with a selection of beverages that complement the flavors of your Onigiri. Traditional options include green tea, sake, and a refreshing Japanese beer. For non-alcoholic choices, consider chilled barley tea or homemade citrus-infused water to balance the spiciness of the tuna filling.
Storage and Reheating Tips
Since Onigiri are best enjoyed fresh, proper storage is essential to maintain their texture and flavor if you have leftovers:
How to Store Leftovers
If you have extra Onigiri, wrap them individually in plastic to prevent them from drying out. Store the wrapped rice balls in an airtight container in the refrigerator for up to one day. Keep the seaweed separate until just before serving to preserve the best texture, as it can become soggy over time.
Reheating Techniques
Onigiri are typically served at room temperature, but if you prefer them warm, let them sit for about 10 minutes before serving. Avoid microwaving them directly, as this can alter the texture of the rice. Instead, reheat gently in a steamer for a few minutes if necessary.
Portioning Tips for Meal Prep
For those who like to meal prep, consider making a batch of Onigiri in advance and storing the rice and fillings separately. Assemble the Onigiri just before eating to maintain their optimal texture and flavor. This approach allows you to enjoy a Quick and Easy Onigiri with Spicy Tuna that is as fresh as when it was first made.

Nutritional Information and Benefits
Understanding the nutritional benefits of your Onigiri with Spicy Tuna can help you appreciate its role in a balanced diet. Here’s a breakdown of what you can expect:
Nutritional Values per Serving
A well-balanced serving of Onigiri typically contains a moderate amount of calories. It has a balanced mix of carbohydrates from the rice, protein from the spicy tuna and healthy fats from the seasonings and seaweed. One Onigiri may provide approximately 250–350 calories, depending on portion size and ingredient choices, making it an ideal option for a light meal or snack.
Ingredient Benefits
- Sushi Rice: Provides essential carbohydrates and a satisfying, filling texture.
- Spicy Tuna: Offers high-quality protein and omega-3 fatty acids that support heart health.
- Seaweed (Nori): A rich source of vitamins and minerals, including iodine, essential for thyroid function.
- Seasonings: Simple ingredients like soy sauce, sesame oil, and sriracha add flavor without excessive calories.
Recommended Portions for a Balanced Diet
Enjoy one or two Onigiri and a side salad or miso soup for a balanced meal. Adjust portion sizes based on your daily caloric needs and activity levels to ensure that your meal provides the right balance of macronutrients and micronutrients to fuel your day.
Common Mistakes to Avoid
Even the best recipes can be marred by common pitfalls. Here are some mistakes to steer clear of when making your Spicy Tuna Onigiri:
Issue 1 – Overcooking the Rice
One frequent mistake is overcooking the sushi rice, resulting in a mushy texture that falls apart when forming the Onigiri. Follow the recommended water-to-rice ratio and cooking times precisely, and let the rice cool to a warm, workable temperature before shaping.
Issue 2 – Inconsistent Filling Distribution
A common challenge is ensuring the spicy tuna filling is evenly distributed within the rice ball. Overfilling can cause the Onigiri to break, while too little filling may leave the flavor unbalanced. Practice creating a slight indentation in the rice, add the perfect filling, and then carefully mold the rice around it.
Issue 3—Neglecting the “Wet Hand” Technique
Since sushi rice is incredibly sticky, failing to wet your hands properly before shaping can lead to frustration and messy Onigiri. Always keep a bowl of salted water nearby and dip your hands frequently to ensure the rice doesn’t stick.
Inspiring Conclusion
The Onigiri with Spicy Tuna recipe is a delightful fusion of traditional Japanese flavors and modern culinary convenience. This dish is more than just a meal—it’s a versatile, portable snack that combines the perfect blend of textures and flavors in every bite. Whether making these rice balls as a quick lunch, a healthy snack on the go, or a fun project to share with family and friends, the process is as rewarding as the final product.
By following this comprehensive guide, you now have all the tools and tips needed to master your own Spicy Tuna Onigiri. Enjoy the process of creating these tasty, nutritious rice balls, experiment with different fillings and toppings, and make this recipe your own. We hope you’ll be inspired to explore the world of Japanese recipes further and discover even more quick lunch ideas and portable snacks to brighten your day.
FAQ (Frequently Asked Questions)
Below are 10 common questions about making Onigiri with spicy tuna, along with detailed answers to help guide you through the process:
- Can I prepare this onigiri recipe in advance?
- Yes, you can prepare the rice and spicy tuna filling beforehand. However, for the best texture, assemble the Onigiri just before eating. If storing, keep the rice and filling separate and wrap the finished Onigiri in plastic wrap, ideally consuming them within 24 hours.
- What is the best way to season the tuna filling?
- The secret to a delicious spicy tuna filling is a balanced mix of soy sauce, sriracha, mayonnaise, and sesame oil. Adjust the amounts based on your heat preference, and consider adding finely chopped green onions for extra flavor.
- How do I prevent the rice from sticking to my hands during assembly?
- Use the “wet hand” technique by dipping your hands in a bowl of salted water before handling the sushi rice. This will make shaping the Onigiri much more manageable and cleaner.
- Can I use brown rice instead of white sushi rice?
- You can mix brown rice with white sushi rice or use it entirely if you prefer a healthier alternative. Remember that brown rice has a different texture and may require slight adjustments in water content.
- What are some good options for filling spicy tuna?
- Suppose you’re not a fan of tuna or prefer a different flavor profile. In that case, you can try fillings like seasoned salmon, marinated tofu, or a combination of vegetables for a refreshing twist on a homemade onigiri.
- How do I ensure the Onigiri hold their shape?
- The key is to work with warm, sticky sushi rice and to apply gentle pressure when molding the rice around the filling. Use a consistent “wet hand” method and avoid overfilling the rice ball.
- Can this recipe be made gluten-free?
- Absolutely. Most onigiri recipes are naturally gluten-free. Ensure that any additional seasonings, sauces, or toppings are also gluten-free.
- What should I serve with Onigiri for a complete meal?
- Onigiri pairs wonderfully with a bowl of miso soup, a simple seaweed salad, or a side of tempura vegetables. These additions create a balanced, authentic Japanese meal.
- How can I customize the spice level of the tuna filling?
- Adjust the amount of sriracha or hot sauce in the tuna mixture according to your taste. For a milder flavor, reduce the spice or balance it with a bit more mayonnaise; add more sriracha or a dash of chili oil for extra heat.
- What are some creative topping ideas for Onigiri?
- Besides seaweed, consider garnishing your Onigiri with sesame seeds, a sprinkle of furikake seasoning, or even a drizzle of spicy mayo. Experiment with different textures and flavors to create a unique twist every time.
The journey to mastering Onigiri with Spicy Tuna is one of creativity, culture, and culinary delight. This Japanese onigiri recipe brings a taste of Japan into your home and provides a fun and interactive way to enjoy a healthy, portable meal that’s perfect for any occasion. With its vibrant flavors, nutritional benefits, and endless adaptability, this recipe is designed to become a staple in your kitchen.
Whether you’re preparing a quick lunch for a busy workday or a creative meal to share with friends and family, these Spicy Tuna Rice Balls are sure to impress. Embrace the art of making Onigiri, experiment with different fillings and toppings, and, most importantly, enjoy the process. Each rice ball is a canvas for your culinary creativity—a little taste of Japan that you can modify and make uniquely your own.
We hope this detailed guide inspires you to dive into the world of Japanese recipes and explore Onigiri’s endless possibilities. Share your creations, experiment with new flavors, and join the community of home cooks who love to make and share delicious, healthy food. Happy cooking, and may your onigiri journey be filled with flavor, fun, and spice!
Spicy Tuna Wonton Cups: The Ultimate Asian-Inspired Appetiser

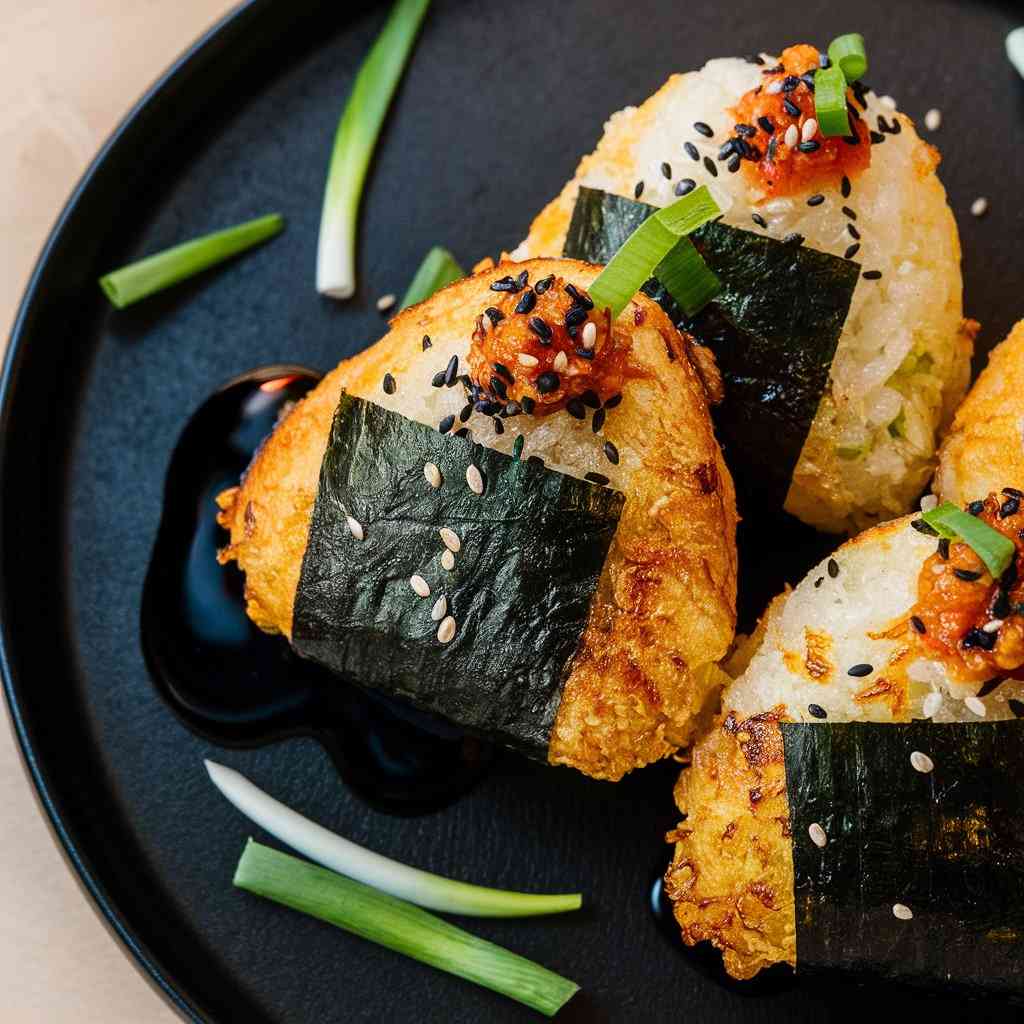
Onigiri with Spicy Tuna
Ingredients
- 2 cups sushi rice
- 2½ cups water
- ¼ cup rice vinegar
- 1 tbsp sugar
- 1 tsp salt
- 1 can tuna (drained)
- 1 tbsp mayonnaise
- 1 tsp sriracha (adjust to taste)
- 2 sheets nori (cut into strips)
- Sesame seeds (optional, for garnish)
Instructions
- Rinse the sushi rice until the water runs clear. Cook the rice with water in a rice cooker or on the stovetop.In a small bowl, mix rice vinegar, sugar, and salt. Heat gently until dissolved. Fold this mixture into the cooked rice and let it cool.In another bowl, combine drained tuna, mayonnaise, and sriracha. Mix well.Wet your hands with water (to prevent sticking) and grab a handful of rice. Flatten it, add a spoonful of spicy tuna filling, and shape it into a triangle or ball.Wrap a strip of nori around the onigiri. Sprinkle with sesame seeds if desired.Serve immediately or wrap for later.
Notes
- For a vegetarian option, replace tuna with avocado or pickled vegetables.
- Store in an airtight container to keep the nori crisp.