
Irresistible No Churn Chocolate Cherry Ice Cream: A Sweet Treat for Any Day
Summer days spent with family are some of my sweetest memories—and what could make them better than a scoop (or two) of No Churn Chocolate Cherry Ice Cream? I remember the first time I made this indulgent frozen treat; it was a hot July afternoon, and my nieces and nephews were clamoring for something cool and delicious. As the ice cream churned (or rather, didn’t churn, thanks to this no-churn recipe!), the air filled with the heavenly scent of rich chocolate and sweet cherries.
What makes this No Churn Chocolate Cherry Ice Cream truly special is its luscious, creamy texture balanced with the delightful bursts of cherry and a touch of fudge. Unlike store-bought varieties, this homemade version is customizable and free of artificial additives, making it not just a dessert, but also a labor of love. Plus, it brings the family together—whether we’re devouring it straight from the tub or layering it between cookies for an ice cream sandwich creation.
In this recipe, you’ll learn how to effortlessly whip up this creamy delight with just a handful of ingredients—no ice cream maker required! So grab a spoon and get ready to create something deliciously memorable.
What are No Churn Chocolate Cherry Ice Cream?
No Churn Chocolate Cherry Ice Cream is exactly what it sounds like—an ice cream recipe that doesn’t require the time and effort of traditional churning methods. Originating from the desire for an easy yet indulgent dessert, this ice cream combines the rich, decadent flavors of chocolate with the tangy sweetness of cherries. The essence of summer is frozen into every scoop, offering a satisfying texture that is as creamy as it is delicious.
Imagine the velvety smoothness melting in your mouth and the juicy bursts of cherry flavor that surprise you with each bite. This no-churn version also means you can indulge in your favorite ice cream flavor without the complicated equipment—it’s perfect for last-minute get-togethers, birthday parties, or simply to treat yourself on a quiet evening.
Why You’ll Love This Recipe
Easy and Stress-Free: With no ice cream maker required, this recipe is unbeatable in simplicity. You simply mix, fold, and freeze. It’s a fantastic introduction to homemade desserts and perfect for novice bakers!
Sensational Flavor: The combination of chocolate and cherry is a classic pairing that’s hard to beat. The luscious semi-sweet chocolate melds perfectly with the sweet maraschino cherries. It’s a flavor explosion in every scoop!
Cost-Effective: Making your own ice cream at home saves money and eliminates the need to splurge on gourmet brands. With just a few ingredients, you’re not only saving pennies but also mastering a delicious treat!
Customizable: Feeling adventurous? You can easily swap in your favorite mix-ins, like nuts or different fruits, making this recipe endlessly adaptable. Go ahead and get creative!
Family Fun: This recipe is an enjoyable project to share with your loved ones. Kids can help mix the ingredients or top the ice cream with their favorite candies, making it a fun activity for everyone.
In just a little over an hour of prep time (plus the freezing!), you’ll be ready to indulge in a bowl of creamy chocolate cherry bliss that’s lightyears ahead of store-bought varieties.
Ingredients
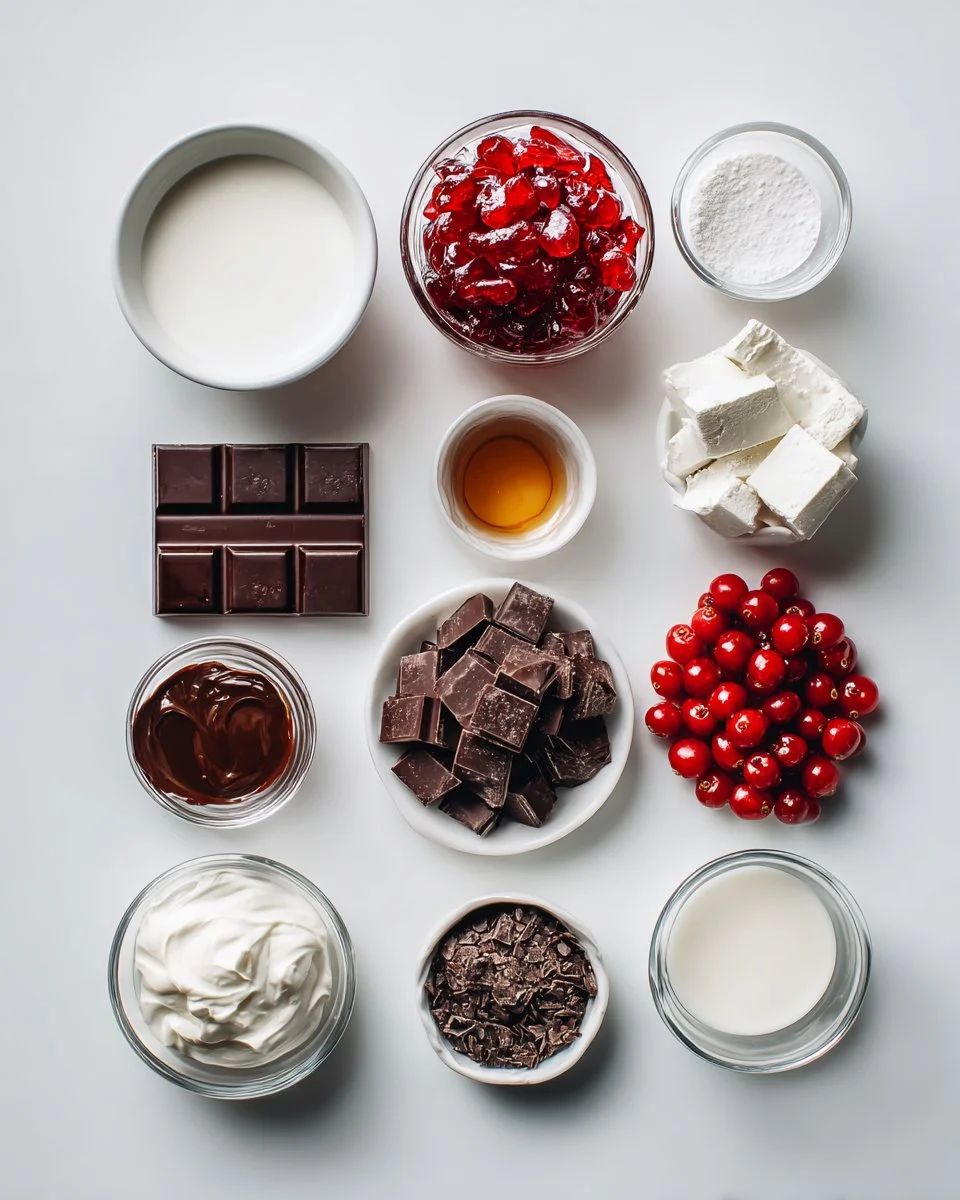
2 cups heavy whipping cream: Make sure to use heavy cream for that rich texture; cold cream whips up best!
1 jar (16 ounces) maraschino cherries, chopped, divided, juice reserved: You can use stems-off cherries for convenience. The reserved juice is essential for flavor!
1 can (14 ounces) sweetened condensed milk: This adds sweetness and creaminess—don’t substitute with evaporated milk!
1 teaspoon vanilla extract: The highest quality vanilla makes a noticeable difference!
1 bar (8 ounces) semi-sweet chocolate, chopped, divided: Use good quality baking chocolate for the best results.
⅔ cup hot fudge topping, store-bought or homemade, divided: This adds a delightful swirl of flavor; don’t skip the fudge!
Notes: All ingredients should be at room temperature to help with the mixing process. I love using brands like Ghirardelli for chocolate and Mrs. Richardson’s for hot fudge—it makes such a difference!
Step-by-Step Instructions
Prepare the Pan: Place a 10×7 inch pan in the freezer to chill. This will help your ice cream set more quickly.
Whip the Cream: In a bowl of a stand mixer, combine the heavy cream. Start at low speed, gradually increasing to medium. Whip until thick and stiff peaks form. This usually takes about 3-5 minutes. Set aside.
Chef’s Tip: If you whip too long, it can turn into butter! Keep an eye on it.
Make the Base: In a medium bowl, mix the reserved cherry juice, sweetened condensed milk, and vanilla extract until well combined.
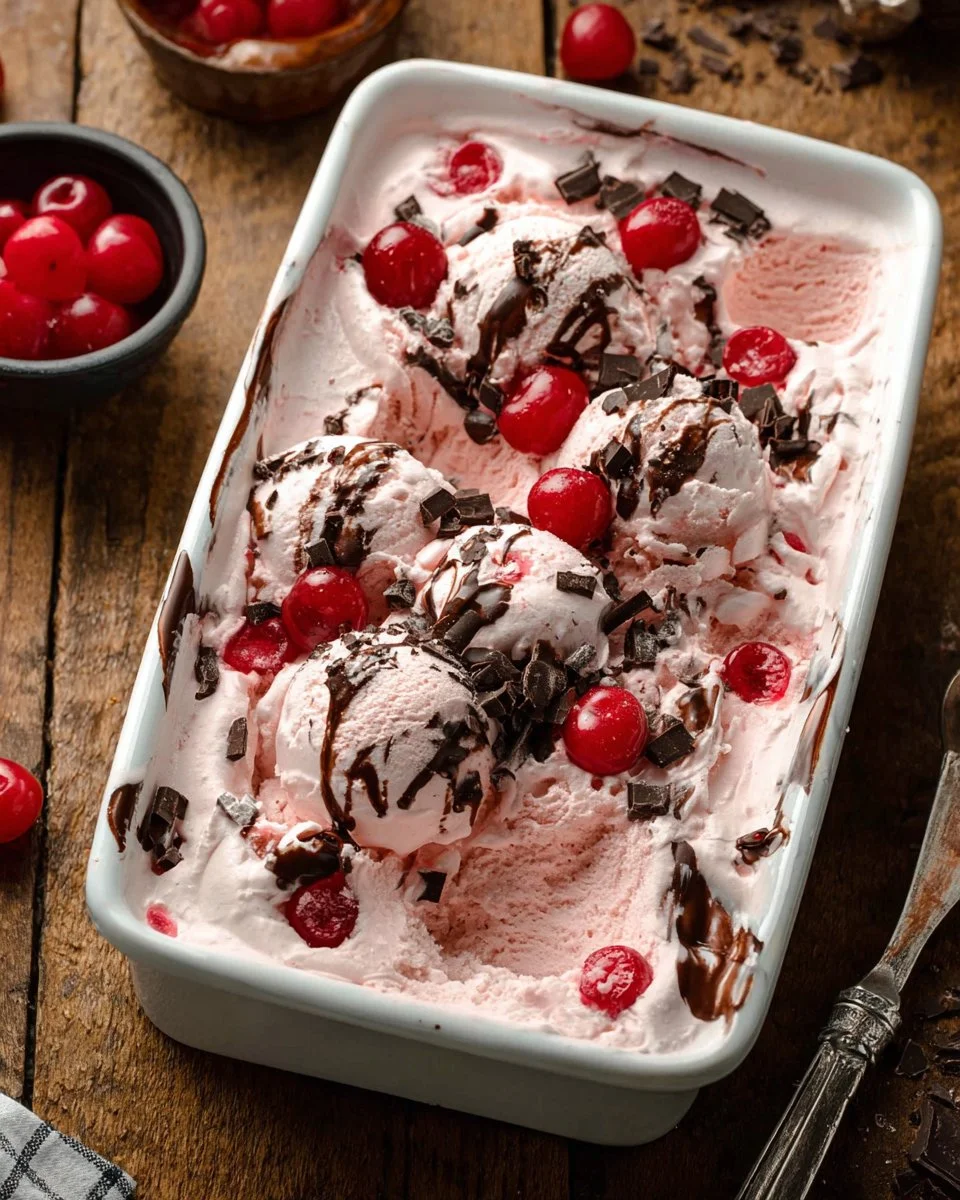
Combine Ingredients: Gently fold the whipped cream into the milk mixture until no streaks remain. Next, fold in the chopped cherries and half of the chopped chocolate, reserving 2 tablespoons for topping.
Layer the Mixture: Pour half of the ice cream mixture into the chilled pan. Drizzle with ⅓ cup of hot fudge topping, then top with the remaining ice cream mixture. Drizzle over the remaining fudge and create a swirling pattern with a knife or spatula.
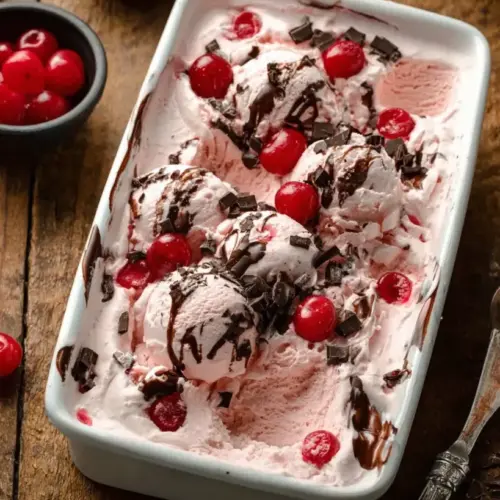
Add the Finishing Touches: Top your creation with the reserved chocolate and some more chopped cherries. Cover with plastic wrap and freeze for at least 6 hours, or until firm.
Common Mistake: Not letting it freeze long enough! Be patient; good things take time!

Expert Tips & Tricks
Storage: Store the ice cream in an airtight container in the freezer for up to two weeks for the best quality.
Make-Ahead: You can prepare this ice cream up to a week in advance! Perfect for parties or gatherings.
Troubleshooting: If your ice cream doesn’t harden, make sure your freezer is cold enough. Sometimes, if too much air is whipped into the cream, it can expand and cause a softer result.
Serving Tip: Run the ice cream scoop under warm water for easier scooping!
Attention to Ingredients: Always use fresh, high-quality ingredients to elevate your homemade ice cream game.
Serving Suggestions
This No Churn Chocolate Cherry Ice Cream can stand on its own, but for an extra special treat, consider serving it alongside a warm brownie, or layer it between two chocolate chip cookies for dreamy ice cream sandwiches. Congrats, you’ve just turned your ice cream into a delightful dessert experience! This recipe is perfect for birthdays, hot summer days, or cozy family movie nights.
Variations & Substitutions
Different Flavor Combinations: Swap the cherries for raspberries or strawberries for a delightful twist. You can also experiment with different fudge flavors or add a dash of almond extract for an unexpected surprise.
Dietary Restrictions: For dairy-free alternatives, use coconut cream in place of heavy cream and search for dairy-free condensed milk.
Seasonal Variations: In the fall, why not incorporate some pumpkin puree and spice to create a pumpkin chocolate chip ice cream? The possibilities are deliciously endless!
Nutrition & Storage Info
- Prep Time: 30 minutes
- Freeze Time: 6 hours
- Total Time: 6 hours 30 minutes
- Yield: Approximately 8 servings
- Calories per serving: Approximately 300 calories (estimated, depending on portions and brands)
Storage Instructions: This ice cream can be kept in the freezer in an airtight container for up to two weeks. Avoid leaving it at room temperature for too long to maintain its texture.
FAQ Section
Can I use fresh cherries instead of maraschino cherries?
Yes, but you’ll need to sweeten them a bit since fresh cherries are less sweet than maraschinos.What can replace the heavy cream in this ice cream?
You can use coconut cream as a vegan alternative, but for the best texture, stick to heavy cream for traditional versions.How can I adjust the sweetness?
Use less condensed milk if you prefer a less sweet ice cream and compensate with extra chocolate.Can I add more chocolate?
Absolutely! You can increase the chocolate amount to suit your taste—just be mindful of the ice cream’s overall balance.Is it necessary to freeze it for 6 hours?
Ideally, yes! It helps develop the right texture. If you’re short on time, aim for at least 3-4 hours.Can I mix in other ingredients like nuts?
Definitely! Just fold them in gently before pouring the mixture into your pan.What if my ice cream becomes too hard in the freezer?
Let it sit at room temperature for 5-10 minutes before scooping to soften.What to do if I want an even creamier texture?
You could consider adding another ½ cup of whipped cream to the base before mixing it together.Can I make this ice cream without the chocolate?
Yes, you can create a cherry ice cream by simply omitting the chocolate and adding more cherries!How do I best store leftovers?
Make sure your container is airtight to prevent freezer burn, and keep it stored at the back of the freezer, away from the door.
Conclusion
This No Churn Chocolate Cherry Ice Cream is more than just a dessert—it’s a celebration of flavors, fun, and family traditions. I encourage you to try this recipe; I promise it will become a staple in your home, just like it is in mine. If you enjoy this recipe, I’d love for you to leave a comment or share your feedback. And don’t forget to check out other sweet treats like my No-Bake Cherry Cheesecake or the indulgent Chocolate Lava Cake featured on the blog! Happy scooping!
No Churn Chocolate Cherry Ice Cream
Ingredients
Cream Base
- 2 cups heavy whipping cream Make sure to use heavy cream for that rich texture; cold cream whips up best!
- 1 can (14 ounces) sweetened condensed milk This adds sweetness and creaminess—don’t substitute with evaporated milk!
- 1 teaspoon vanilla extract The highest quality vanilla makes a noticeable difference!
Cherries and Chocolate
- 1 jar (16 ounces) maraschino cherries, chopped, divided, juice reserved You can use stems-off cherries for convenience. The reserved juice is essential for flavor!
- 1 bar (8 ounces) semi-sweet chocolate, chopped, divided Use good quality baking chocolate for the best results.
Fudge Topping
- ⅔ cup hot fudge topping, store-bought or homemade, divided This adds a delightful swirl of flavor; don't skip the fudge!
Instructions
Preparation
- Place a 10x7 inch pan in the freezer to chill.
- In a bowl of a stand mixer, combine the heavy cream. Start at low speed, gradually increasing to medium. Whip until thick and stiff peaks form, about 3-5 minutes.
- In a medium bowl, mix the reserved cherry juice, sweetened condensed milk, and vanilla extract until well combined.
- Gently fold the whipped cream into the milk mixture until no streaks remain. Next, fold in the chopped cherries and half of the chopped chocolate, reserving 2 tablespoons for topping.
Layering
- Pour half of the ice cream mixture into the chilled pan. Drizzle with ⅓ cup of hot fudge topping, then top with the remaining ice cream mixture.
- Drizzle over the remaining fudge and create a swirling pattern with a knife or spatula.
- Top with reserved chocolate and some more chopped cherries. Cover with plastic wrap and freeze for at least 6 hours, or until firm.