

Irresistibly Soft Frosted Red Velvet Cupcake Cookies Recipe
Growing up in my family, dessert was a celebrated event, and nothing held a candle to my grandmother’s red velvet cake. I remember the warm aroma of cocoa and vanilla wafting through the kitchen as kids, my siblings and I would peep over the countertops, eyes wide with anticipation. It wasn’t just the deliciousness of her cake; it was the love baked into every layer that made it unforgettable. Now, I’ve taken that cherished recipe and transformed it into my soft and chewy Frosted Red Velvet Cupcake Cookies. These delightful cookies perfectly encapsulate the rich, velvety flavor of a classic red velvet cupcake but in a fun and portable cookie format!
Why are these cookies so special, you ask? For starters, they boast a beautiful crimson hue that immediately makes any gathering feel festive. They stand out from other cookie recipes by balancing rich flavors with a soft, cake-like texture. Plus, the luscious cream cheese frosting takes them to a whole new level. Get ready to create delicious memories in your own kitchen as you learn how to whip up these incredible cookies! I promise you’ll feel that warm glow of nostalgia and satisfaction with each bite.
What Are Frosted Red Velvet Cupcake Cookies?
Originating from the South, red velvet desserts have transcended their humble beginnings to become iconic favorites. Frosted Red Velvet Cupcake Cookies take the classic flavor profile—cocoa, buttermilk, and a hint of vanilla—and morph them into soft, tender cookies that embody everything we love about red velvet.
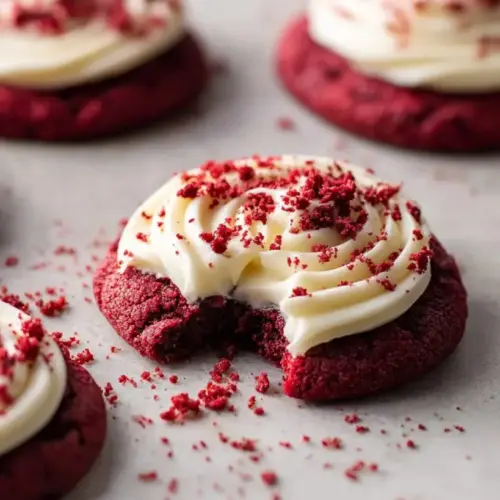
These cookies are not only visually stunning with their vibrant red hue but are also delightfully soft and chewy. When you bite into one, you’re met with a cake-like consistency that melts in your mouth, leaving a symphony of flavors dancing on your palate. The combination of rich cocoa, sweet cream cheese frosting, and the subtle tang of vinegar creates an irresistible treat that’s perfect for any occasion—from birthday parties to holiday celebrations or just an afternoon pick-me-up!
Why You’ll Love This Recipe
Easy to Make: This recipe is straightforward, making it perfect for novice bakers. You’ll be surprised by how quickly these cookies come together, and in just about 30 minutes, you’ll have fresh cookies to share or devour all by yourself!
Customizable: Want to amp up the flavors? Consider adding chocolate chips or nuts for a unique twist. You can even adjust the frosting by using flavored cream cheese or adding citrus zest for a zesty surprise.
Cost-Effective: Making these at home is much cheaper than buying them from a bakery! And with basic pantry ingredients, you likely already have everything you need to whip them up.
Perfect for Sharing: These cookies are just as visually appealing as they are delicious. They’re great for sharing at gatherings, gifting, or enjoying together with friends and family, bringing joy wherever they go.
Frosting Galore: There’s something magical about pairing cookies with frosting—these cookies are not just a treat; they transform into a delightful dessert experience that’s bound to impress everyone at your table.
Ingredients
For the Cookie:
- 1 & 1/2 cups (180g) all-purpose flour (spooned and leveled)
- 1/4 cup (20g) unsweetened cocoa powder
- 1 tablespoon instant milk powder
- 1 tablespoon cornstarch
- 1/2 teaspoon baking powder
- 1/4 teaspoon baking soda
- 1/4 teaspoon salt
- 1/2 cup (1 stick / 115g) unsalted butter, softened to room temperature
- 3 tablespoons vegetable oil (or any neutral flavored oil)
- 1/2 cup (100g) packed brown sugar (light or dark)
- 1/2 cup (100g) granulated sugar
- 1 large egg, at room temperature
- 1 teaspoon pure vanilla extract
- 1 teaspoon white vinegar
- 1 to 2 teaspoons red liquid-gel food coloring (*adjust to your desired shade)
For the Cream Cheese Frosting:
- 3 ounces (85g) block cream cheese (softened)
- 6 tablespoons (90g) unsalted butter, softened to room temperature
- 1 teaspoon pure vanilla extract
- 1 & 1/2 cups (195g) powdered sugar (adjust for sweetness)
Notes:
- Ingredient Quality: Always opt for high-quality ingredients. For the butter, I recommend using brands like Kerrygold for a creamier texture.
- Room Temperature Ingredients: Ensure your butter and eggs are at room temperature; it helps integrate the batter better for a soft, fluffy texture.
- Food Coloring: Gel food coloring gives beautiful, vibrant results without thinning the batter.
Step-by-Step Instructions
Preheat your oven to 350°F (175°C) and line your baking sheets with parchment paper.
Mix Dry Ingredients: In a medium-sized bowl, whisk together the flour, cocoa powder, milk powder, cornstarch, baking powder, baking soda, and salt to combine. Set aside.
Cream Butter and Sugars: In a large bowl, combine the softened butter, vegetable oil, brown sugar, and granulated sugar. Whisk until smooth and well blended.
Add Egg and Flavoring: Whisk in the egg and vanilla until fully incorporated. Pour in the vinegar and add food coloring, mixing until well combined. The dough will look quite vibrant at this stage.
Combine Wet and Dry: Slowly fold the dry ingredients into the wet mixture, ensuring you don’t overmix. The dough will be thick and sticky.
Scoop the Dough: Using a large (3 to 4 tablespoons) cookie scoop, place generous portions of dough onto the prepared baking sheets, leaving 3 inches between each scoop to allow for spreading.
Bake: Place in the center of your preheated oven and bake for 12 to 15 minutes, or until puffed and slightly spread out. The edges should just begin to turn a very light golden brown.
Cool: Let the cookies cool on the baking sheet for about 5 minutes before transferring them to a wire rack to cool completely.
Make the Frosting: In a medium bowl, cream together the cream cheese and butter until smooth. Add the vanilla and powdered sugar, mixing until you achieve a creamy consistency. If it is too soft, chill it in the fridge for 30-60 minutes.
Frost Them Up: Once the cookies are fully cooled, pipe or spread the cream cheese frosting generously on top. For a fun touch, crumble any uneven cookies to sprinkle on top!
Expert Tips & Tricks
- Storage: Keep the cookies in an airtight container at room temperature for up to 4 days. If refrigerated, they can last about a week.
- Make Ahead: You can prepare the dough ahead of time. Simply wrap it in plastic wrap and refrigerate for up to 3 days or freeze for up to 2 months. Thaw in the fridge before baking!
- Troubleshooting: If your cookies come out flat, ensure your baking powder and baking soda are fresh. Additionally, check that your butter is properly creamed, as this incorporates air for a fluffy texture.
- Share the Love: I often double the batch and gift some to friends and family. They always devour them and ask for more!
Serving Suggestions
These Frosted Red Velvet Cupcake Cookies are exquisite on their own, but you can make the experience even better! Pair them with a glass of cold milk or a steaming cup of coffee. For a festive touch, serve them on a colorful platter, garnished with fresh berries or edible flowers for presentation.
They are perfect for a birthday bash, holiday gatherings, or simply to brighten up a rainy day!
Variations & Substitutions
- Different Flavors: If chocolate isn’t your thing, why not try other flavors like vanilla bean or a sprinkle of peppermint extract?
- Dietary Needs: For gluten-free options, substitute all-purpose flour with a 1:1 gluten-free blend. You can also use vegan cream cheese for a dairy-free treat.
- Seasonal Variations: Get creative! Try adding festive spices like cinnamon during the holidays or zest from an orange for a spring twist.
Nutrition & Storage Info
- Prep Time: 15 minutes
- Cook Time: 12-15 minutes
- Total Time: 30–35 minutes
- Yield: About 18 cookies
- Calories: Approximately 150 calories per cookie
- Storage: Store at room temperature in an airtight container for up to 4 days. Refrigerate and they last about a week; freeze for two months for longer storage.
FAQ Section
Can I freeze these cookies?
Absolutely! You can either freeze the baked cookies (after frosting) or the unbaked dough. Just make sure to wrap them tightly.What can I use if I don’t have cream cheese for frosting?
You can substitute with mascarpone cheese or a whipped buttercream frosting.How do I achieve the perfect red color?
Use gel food coloring for more vibrant results. Start with one teaspoon and add more until the desired color is achieved.What if my dough is too sticky?
If your dough feels too sticky, chill it in the refrigerator for about 30 minutes before baking.Are these cookies soft after baking?
Yes! They should have a soft and slightly chewy texture that resembles a cupcake.Can I make these cookies without cocoa powder?
You can use a flour substitution, but you’d miss that rich flavor. Consider replacing some flour with more milk powder if you want a vanilla version.How can I make these cookies more festive?
Try topping them with colorful sprinkles or use cookie cutters to create fun shapes for special occasions!Can I add nuts to the dough?
Definitely! Chopped pecans or walnuts would add a delightful crunch and flavor.Is there a way to make these cookies vegan?
Use flax eggs instead of regular eggs, and substitute dairy butter with soft plant-based butter and use plant-based cream cheese for frosting.What did you think of adding different spices?
Absolutely! A little pinch of cinnamon or nutmeg can deepen the flavor greatly. Just be mindful of your spice combo!

Conclusion
These Frosted Red Velvet Cupcake Cookies are a delightful blend of nostalgia and flavor that will become a cherished recipe in your repertoire. Whether you’re baking for a special occasion or just looking to satisfy a sweet tooth, these cookies promise to deliver a little magic every time. I’d love to hear about your experiences making them—share your thoughts and creations in the comments below! And if you’re looking for more delicious ideas, don’t forget to check out my other sweet treats on the blog. Happy baking!
Frosted Red Velvet Cupcake Cookies
Ingredients
For the Cookie
- 1.5 cups all-purpose flour (spooned and leveled)
- 1/4 cup unsweetened cocoa powder
- 1 tablespoon instant milk powder
- 1 tablespoon cornstarch
- 1/2 teaspoon baking powder
- 1/4 teaspoon baking soda
- 1/4 teaspoon salt
- 1/2 cup unsalted butter, softened to room temperature Recommend high-quality butter such as Kerrygold for a creamier texture.
- 3 tablespoons vegetable oil (or any neutral flavored oil)
- 1/2 cup packed brown sugar (light or dark)
- 1/2 cup granulated sugar
- 1 large egg, at room temperature Room temperature helps integrate the batter better.
- 1 teaspoon pure vanilla extract
- 1 teaspoon white vinegar
- 1-2 teaspoons red liquid-gel food coloring Adjust to your desired shade.
For the Cream Cheese Frosting
- 3 ounces block cream cheese, softened
- 6 tablespoons unsalted butter, softened to room temperature
- 1 teaspoon pure vanilla extract
- 1.5 cups powdered sugar (adjust for sweetness)
Instructions
Preparation
- Preheat your oven to 350°F (175°C) and line your baking sheets with parchment paper.
- In a medium-sized bowl, whisk together the flour, cocoa powder, milk powder, cornstarch, baking powder, baking soda, and salt to combine. Set aside.
- In a large bowl, combine the softened butter, vegetable oil, brown sugar, and granulated sugar. Whisk until smooth and well blended.
- Whisk in the egg and vanilla until fully incorporated. Pour in the vinegar and add food coloring, mixing until well combined.
- Slowly fold the dry ingredients into the wet mixture, ensuring you don’t overmix. The dough will be thick and sticky.
- Using a large (3 to 4 tablespoons) cookie scoop, place generous portions of dough onto the prepared baking sheets, leaving 3 inches between each scoop to allow for spreading.
Baking
- Place in the center of your preheated oven and bake for 12 to 15 minutes, or until puffed and slightly spread out. The edges should just begin to turn a very light golden brown.
- Let the cookies cool on the baking sheet for about 5 minutes before transferring them to a wire rack to cool completely.
Making the Frosting
- In a medium bowl, cream together the cream cheese and butter until smooth.
- Add the vanilla and powdered sugar, mixing until you achieve a creamy consistency. If it is too soft, chill it in the fridge for 30-60 minutes.
Frosting the Cookies
- Once the cookies are fully cooled, pipe or spread the cream cheese frosting generously on top.
- For a fun touch, crumble any uneven cookies to sprinkle on top!