
Indulgent Chocolate Mousse Brownies: A Heavenly Dessert You’ll Adore!
I’ll never forget the first time I whipped up a batch of Chocolate Mousse Brownies. It was a cozy winter evening, and I was returning from a family gathering, inspired by the laughter, warmth, and, of course, the dessert table brimming with delights. As I delved into my own kitchen, I envisioned a dessert that encapsulated the best of both worlds: the fudgy richness of brownies and the airy decadence of chocolate mousse.
These Chocolate Mousse Brownies are not just any dessert; they are a heartwarming bridge that connects sweet memories with each indulgent bite. Every forkful brings back a flood of nostalgia for cozy family gatherings and sweet celebrations. While many brownies miss the mark with their dry texture or overly sweet flavor, this recipe stands out. It combines the best chocolatey goodness with a light-as-air mousse that elevates the experience beyond mere brownies.
So, get your apron on! In this post, you will learn how to create these glorious Chocolate Mousse Brownies that are sure to become a cherished family favorite.
What Are Chocolate Mousse Brownies?
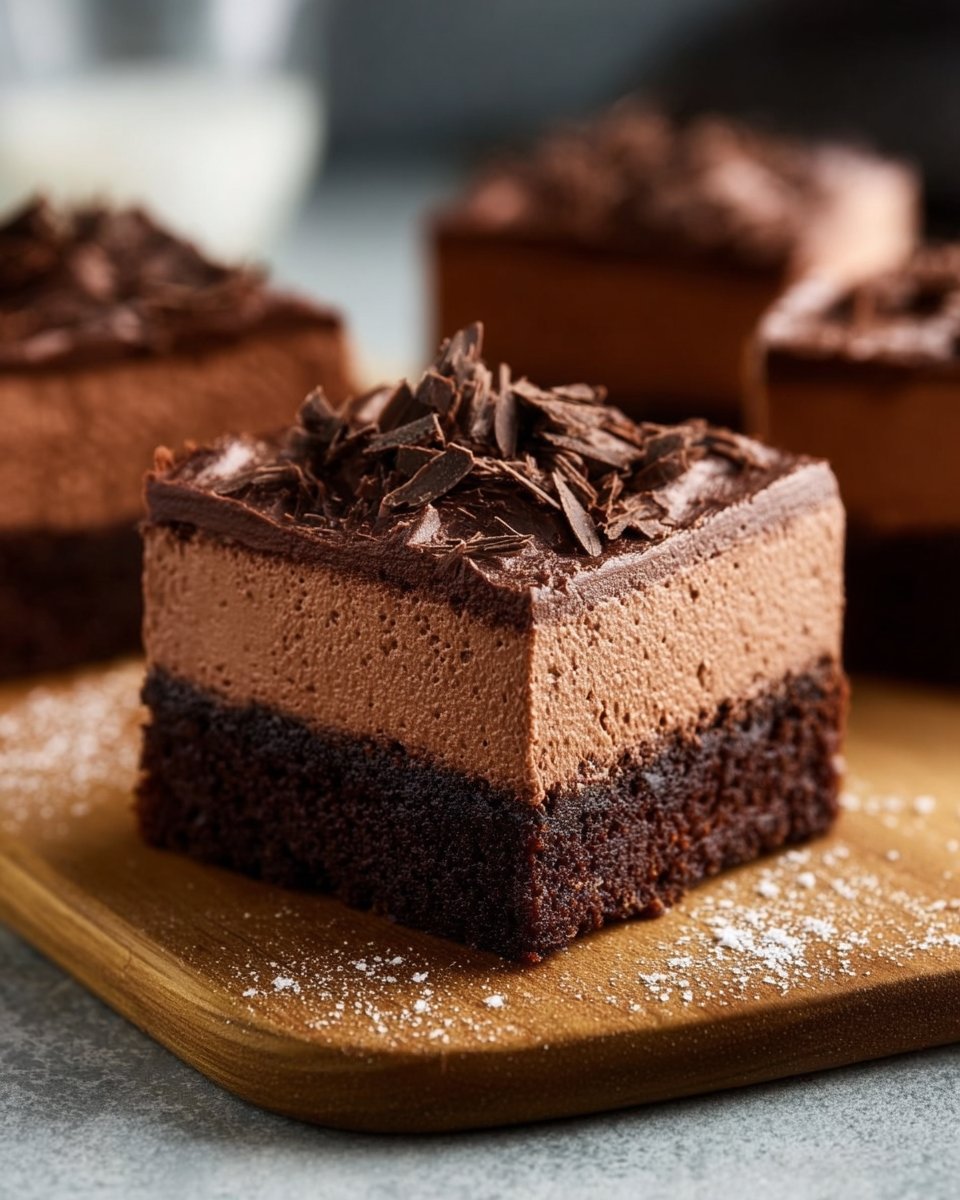
Imagine, if you will, the quintessential chocolate treat—a dense, fudgy brownie layered beneath a luscious, creamy chocolate mousse. Back in the day, I stumbled upon a similar recipe while experimenting with various desserts and instantly fell in love. The combination is a delightful fusion of textures and flavors, where the rich, chewy brownie contrasts with the light, velvety mousse.
A combination of cocoa and semi-sweet chocolate gives these brownies an intense chocolate flavor, while the mousse adds a dreamy lightness that takes each bite to a level of bliss most store-bought treats simply can’t match. Chocolate Mousse Brownies are perfect for celebrations, impressing guests, or indulging your inner sweet tooth during a quiet night in. Whether for a birthday, holiday, or just because, these brownies are bound to impress—and they will quickly become the star of any dessert table!
Why You’ll Love This Recipe
1. Decadent Flavor
The rich cocoa and chocolate flavors are so satisfying, your taste buds will be dancing with joy. Each brownie is a dense, chewy chocolate base topped with an ethereal chocolate mousse, making it a flavor experience you’ll crave again and again.
2. Homemade vs. Store-Bought
Let’s face it, store-bought desserts can’t hold a candle to your homemade creations. These Chocolate Mousse Brownies are made with quality ingredients, and in my experience, they taste far superior to anything you can buy—plus they are so much fresher!
3. Cost-Effective Dessert
Why splurge on expensive restaurant desserts when you can whip these up for a fraction of the price? All ingredients are readily available, and it’s an investment worth making for such a rewarding outcome.
4. Customizable
Feel free to get creative! Add flavors like peppermint extract or sea salt for a twist, or swap out the semi-sweet chocolate for dark chocolate if you’re feeling more adventurous. The possibilities are endless!
5. Easy to Make
Taking only about 30 minutes of hands-on time with a little chilling, anyone can tackle this recipe—even those who consider themselves kitchen novices!
Ingredients
Here are the key ingredients to create your indulgent Chocolate Mousse Brownies. I’ve also included some notes on substitutions and enhancements to make this dessert truly exceptional!
- 1 cup unsweetened cocoa powder (I recommend Ghirardelli for a deep chocolate flavor)
- 1 cup granulated sugar
- 1/2 cup butter, melted (Use unsalted for more control over the sweetness)
- 4 large eggs (Room temperature for better mixing)
- 1 teaspoon vanilla extract (Pure vanilla is always a winner)
- 1/2 cup all-purpose flour
- 1/4 teaspoon salt (Sea salt elevates the flavors nicely)
- 1 cup heavy cream (Essential for that fluffy mousse!)
- 1 cup semi-sweet chocolate chips (Ghirardelli or Nestlé Toll House work wonders)
- 1/2 cup powdered sugar
Prep Notes
- Ensure the butter is melted and slightly cooled before mixing to avoid scrambling the eggs.
- You can substitute coconut oil for butter for a dairy-free option.
- If you’re short on cocoa powder, you can use Dutch-process cocoa for a richer flavor.
Step-by-Step Instructions
1. Preheat the oven
Preheat your oven to 350°F (175°C). Grease a 9×9 inch baking pan with butter or line it with parchment paper for easy removal.
2. Prepare the brownie batter
In a large bowl, combine the cocoa powder, sugar, melted butter, eggs, and vanilla extract. Mix until smooth—this is where the rich aroma of chocolate starts to fill your kitchen, so take a moment to inhale!
3. Add dry ingredients
Gently fold in the all-purpose flour and salt until just combined, being careful not to overmix. The batter should be thick and glossy, ready to transform into brownie goodness.
4. Bake the brownies
Pour the brownie mixture into the prepared baking pan, spreading it evenly. Bake for 20-25 minutes or until a toothpick inserted in the center comes out clean. Keep an eye on these beauties—ovens can be sneaky!
5. Melt chocolate for mousse
While the brownies are baking, melt your chocolate chips in a microwave-safe bowl in 30-second increments, stirring in between until smooth. Let it cool slightly.
6. Whip the cream
In another bowl, whip the heavy cream until soft peaks form. Gradually add in the powdered sugar, continuing to whip until stable peaks form.
7. Combine for mousse
Gently fold the melted chocolate into the whipped cream until completely combined. This smooth, luscious mixture is your mousse layer. Save some for tasting—you deserve it!
8. Assemble
Once the brownies have cooled completely, spread the chocolate mousse evenly over the top using a spatula.
9. Chill
Cover the pan and chill in the refrigerator for at least 2 hours to let the mousse set.
10. Serve
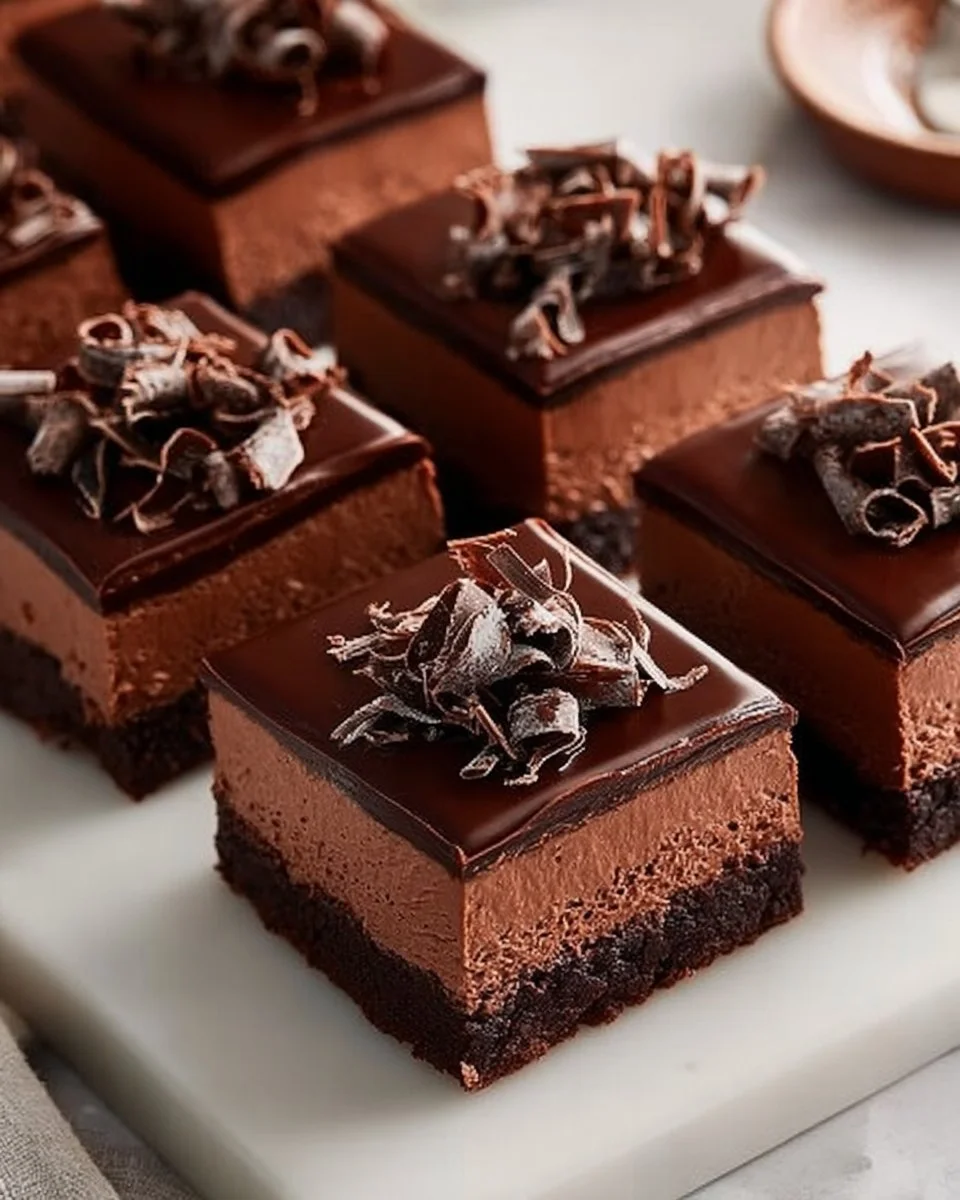
Once set, cut into squares and serve. Consider topping with extra whipped cream or shaved chocolate for an elegant touch.

Expert Tips & Tricks
- Brownie Texture: For ultimate fudginess, do not overbake the brownies. A few moist crumbs on your toothpick are perfect.
- Chilling Time: The longer you chill the mousse, the better it will set and hold its shape when cut.
- Storage: Store any leftovers in an airtight container in the fridge for up to a week. You can also freeze the brownies (with mousse) for up to 3 months—just thaw overnight in the fridge before serving.
- Make-ahead: The brownies can be baked a day ahead; just assemble the mousse layer the day you plan to serve.
- Troubleshooting: If your mousse isn’t fluffing up, ensure your heavy cream is very cold when whipping—it can make all the difference!
Serving Suggestions
These Chocolate Mousse Brownies shine on their own, but pairing them with a scoop of vanilla ice cream or a dollop of whipped cream takes them over the top! For a lovely presentation, dust with cocoa powder or powdered sugar just before serving. They are perfect for cozy dinners, holiday gatherings, or simply as a special treat for yourself—because why not?
Variations & Substitutions
Feeling adventurous? Here are some delicious variations to make this recipe your own!
- Nutty Delight: Add chopped walnuts or pecans to the brownie batter for a delightful crunch.
- Minty Fresh: Incorporate peppermint extract into the brownie batter for a festive surprise.
- Citrus Zing: Stir in orange zest into the mousse for a refreshing twist.
- Dietary Restrictions: For a gluten-free version, swap the all-purpose flour for almond flour or a gluten-free flour blend.
Nutrition & Storage Info
- Prep Time: 30 minutes
- Cook Time: 25 minutes
- Total Time: 2.5 hours (including chilling)
- Yield: 16 servings
- Calories: Approximately 250 per serving (varies based on the brands used)
- Storage Instructions:
- Room Temperature: Not recommended for more than an hour or two as the mousse should be chilled.
- Fridge: Up to 1 week in an airtight container.
- Freezer: Up to 3 months (thaw in the refrigerator).
FAQ Section
Can I use milk chocolate instead of semi-sweet chocolate?
Yes, but be prepared for a sweeter mousse! Milk chocolate will enhance the creaminess but will also up the sugar content.Why is my mousse not setting properly?
Ensure your whipped cream is at the correct temperature and consistency; it should be cold and whipped to soft peaks before combining.Can I make this a day ahead?
Absolutely! The brownies can be made in advance, and the mousse can be added the next day. Just keep it covered in the fridge.What if I don’t have an 9×9-inch pan?
You can use other size pans, but adjust the baking time accordingly—check for doneness a little earlier if using a larger pan.Can I substitute eggs?
Flaxseed meal or unsweetened applesauce can be used as an egg substitute, but using 1/4 cup of either for each egg is recommended.How can I make these brownies dairy-free?
Swap butter for coconut oil and use dairy-free chocolate chips and heavy cream for the mousse.Are these brownies suitable for freezing?
Yes! They freeze beautifully. Just ensure they’re well-wrapped to prevent freezer burn.Do I need to add the mousse layer?
Not at all! If you prefer classic brownies, enjoy them fresh out of the oven without the mousse.What are some common mistakes to avoid?
Overmixing the brownie batter and overbaking are the most common pitfalls. Keep an eye on the baking time—use the toothpick test!Can I use a different type of chocolate?
Definitely! Dark chocolate will provide a richer flavor, while white chocolate can be used for a sweet variation.
Conclusion
In conclusion, these Chocolate Mousse Brownies are not just any dessert; they are a sumptuous combination of comfort, nostalgia, and pure indulgence. Whether shared with friends or enjoyed in solitude, each bite promises to envelop you in warmth and happiness.
I encourage you to give this recipe a try and share your thoughts! Did you add your own special twist? Comment below—I’d love to hear about your experience and any related recipes you’d like to explore on the blog. Happy baking!

Chocolate Mousse Brownies
Ingredients
Brownie Ingredients
- 1 cup unsweetened cocoa powder Recommended: Ghirardelli for a deep chocolate flavor.
- 1 cup granulated sugar
- 1/2 cup butter, melted Use unsalted for more control over sweetness.
- 4 large eggs Use room temperature for better mixing.
- 1 teaspoon vanilla extract Pure vanilla is always a winner.
- 1/2 cup all-purpose flour
- 1/4 teaspoon salt Sea salt elevates the flavors nicely.
Mousse Ingredients
- 1 cup heavy cream Essential for fluffy mousse!
- 1 cup semi-sweet chocolate chips Recommended: Ghirardelli or Nestlé Toll House.
- 1/2 cup powdered sugar
Instructions
Preparation
- Preheat your oven to 350°F (175°C). Grease a 9x9 inch baking pan with butter or line it with parchment paper.
- In a large bowl, combine the cocoa powder, sugar, melted butter, eggs, and vanilla extract. Mix until smooth.
- Gently fold in the all-purpose flour and salt until just combined.
Baking
- Pour the brownie mixture into the prepared baking pan. Bake for 20-25 minutes or until a toothpick comes out clean.
- While the brownies bake, melt the chocolate chips in a microwave-safe bowl and let cool slightly.
Making the Mousse
- Whip the heavy cream in a bowl until soft peaks form. Gradually add in powdered sugar.
- Gently fold the melted chocolate into the whipped cream until combined.
Assembling
- Once the brownies have cooled, spread the mousse evenly over the top.
- Cover and chill in the refrigerator for at least 2 hours.
- Cut into squares and serve, optionally topping with whipped cream or shaved chocolate.